Have you ever been to a chocolate museum? I have.
A few years ago, I had the opportunity to visit the Stollwerck’s Chocolate Musueum in Germany. It was definitely an exhilarating experience.
First of all, the smell of chocolate that greets you as you enter the facility is one big sensory assassination-in a good way- and my senses responded to the stimulus accordingly.
I was like Willy Wonka the first time he set foot in the chocolate factory. I must have had my eyes wide open to make sure that I didn’t miss any of the chocolatey sights to behold. Ooohhhh...chocolates in all it’s forms and colors. I was in cloud 9 that day!
It was fascinating to note the difference between each type of chocolate - from dark, milk to white. There were also interesting tidbits to learn, like the history of chocolate and how it came to Europe, and the evolution of chocolate from then up to the present.... But I gotta admit, I really wasn’t paying so much attention to what the tour guide was saying. How can I concentrate when there’s a chocolate fountain nearby spurting some dark silky flowing lava of chocolate?? And right next to it was a bevy of pretzels, wafers and cookies ready to be dipped into that chocolatey goodness! And it's free for everyone to try! Hmmnn... I would have gladly remained right at that spot by the chocolate fountain while the rest of the tour progresses!
But thankfully, I managed to control myself and I went on with the tour. Afterall, there's a promise of a reward - being able to purchase their chocolate products at half the price at the end of the tour!
Needless to say, I left that chocolate museum with a big smile on my face and a bag-full of assorted chocolates -- so happy, that I swear I had a skip in my step, like a little child. Yeah, good times....This memory still brings a smile to my lips...

Anyhoe, here's my Molten Chocolate Cake. I made this a while back, just shortly before I had to leave for my trip to the Philippines a couple of months ago.
I was watching Wolfgang Puck’s show (Live, Love, Eat) on TV when he happened to be making this decadent dessert. Eversince that day, the vision of that luscious-chocolate cake haunted me, that I just gotta make it. But as always, life interferred so it took me a few weeks before I finally had the chance to do so.
But at last, here it is. What could be better than a warm chocolate cake from the oven oozing with chocolate goodness from the center? And it's easy to do. Believe me, this super-rich, gooey treat is what you need for next time that chocolate craving hits you.
Molten Chocolate Cake
Wolfgang Puck
8 oz. unsalted butter
5 oz. bittersweet chocolate, chopped
3 large eggs
3 large egg yolks
1/4 C. sugar
3 Tbs. all-purpose flour
Lightly sweetened whipped cream or good quality vanilla ice cream, for serving (optional) Raspberries and mint leaves, for garnish
1. Preheat the oven to 350 degrees.
2. Put about 3 oz. of the butter in a microwave-proof dish or a small saucepan. Heat in the microwave, or in the pan over low heat, just until the butter has melted. Thoroughly brush the insides of 6 individual 8-oz. custard cups or ramekins with the melted butter.
3. Cut up the remaining butter into pieces. Put the chocolate pieces and the butter pieces in the top pan of a double boiler or a medium heatproof bowl set over but not touching simmering water. Heat them, stirring frequently, until completely melted and smoothly blended. Remove the pan or bowl from the heat and set aside.
4. Put the eggs, egg yolks, and sugar in the large bowl of an electric mixer, or in a mixing bowl if you are using a handheld electric mixer. Beat the eggs and sugar together at medium-high speed until the mixture turns pale yellow, thick, and creamy, about 5 minutes.
5. About a third at a time, use a spatula to fold the egg mixture into the chocolate mixture. Gently fold in the flour just until no streaks remain. With a ladle or large spoon, transfer this batter to the prepared custard cups or ramekins, filling them about two-thirds full. Put the cups or ramekins on a baking sheet.
6.Bake just until the cakes have risen and their sides look firm, 10-12 minutes, taking care not to over-bake them. Remove the baking sheet from the oven, carefully remove the cups or ramekins from the baking sheet, and set them aside to cool slightly for about 10 minutes.
7. Unmold onto individual serving plates, or simply place a cup or ramekin on each plate for serving.
8. Offer whipped cream or vanilla ice cream for each person to eat with the cake, if preferred.
 Finally, I made it. I’m posting my very first regular blog after so many weeks of being away. Many of you know that I’ve traveled back to the beloved country where I originally come from, the Philippines. I was there for 5 weeks. My father had an emergency issue with his health that needed to be dealt with. His right leg had to be amputated asap, due to a gangrenous wound that had not healed for 9 months. We were trying to avoid losing my father’s limb, but in the end, it was still necessary, as the infection was growing and spreading fast. That’s why I had to be home for the operation to support my father. My mom passed away of breast cancer just last year. And I am an only child, so it goes without saying that I am the only one my father has to lean on for support (no pun intended).
Anyhow, now that I’m back home in the U.S. with my dear husband, I can only hope and pray that no other emergency concerning my father’s health will take place ever again. It is not only financially challenging, but emotionally trying as well. I can only take so much of those!
In the meantime, I am happy to share with you that my father is doing much better and is getting stronger by the day. Thank God.
I was hoping to be able to get back on blogging immediately after I came back from my trip, but between the jet-lag and work, it was just physically impossible. And honestly, I lost my blogging “mojo” for a while due to my exhausted mind and body. But not to worry, I am slowly recovering.. and pretty soon, I will be prolific again! Promise!

Today, I would like to share with you my breakfast, reminiscent to the ones I had while growing up in the Philippines.
A traditional Filipino breakfast is a full meal with rice, usually fried rice. Some years ago, a TV comedy sitcom coined the term tapsilog - which refers to a breakfast combination of tapa (cured beef), sinangag (fried rice) and itlog (fried egg). This is a typical Filipino breakfast, but it was the show's "slang" that ignited its popularity, so much so that restaurants and even fast food chains have included these combo type breakfast meals in their menu. Since then, tapsilog has spawned so many other dishes (or slang terms, I should say) such as tocilog, (with tocino, the Filipino's version for bacon); longsilog (with longganisa, the Filipino breakfast sausage); and yes, spamsilog, (with SPAM, obviously) - all with fried rice and eggs.
SPAM is a favorite luncheon meat in the Philippines, but not enjoyed all too often because it is an imported stuff therefore, more expensive than local brands.
Anyhow, here's my spamsilog. I’m so proud to say that while Mr. J doesn’t count Spam as a favorite, but he willingly partakes of it with me every once in a while! I’d say that’s love, huh? :oD
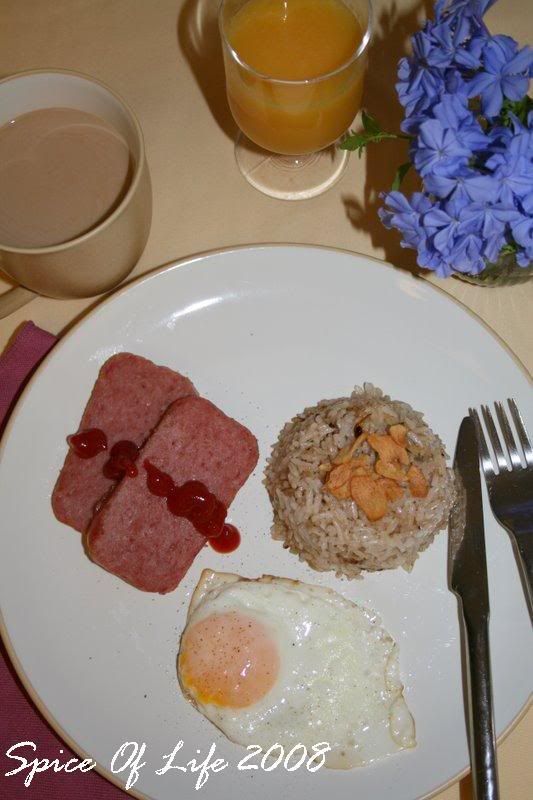
This breaksfast is an easy one to prepare. For the spam, it is basically ready to eat so I just warmed it up a bit in the skillet. The eggs you can have however you prefer 'em --fried, scrambled, overeasy.. it doesn't matter. The only thing I really had to cook was the garlic fried rice, which I topped with garlic chips that I had gotten from the Philippines. Talk about garlic breath and all! You can bet no witch came near our house that day!
For the fried rice, it is best to use left-over rice. Don't use freshly cooked rice, as your rice will come out mushy. Make sure to separate the rice; I find that the easiest and best way to do this is to use your finger and work them through the rice to break the lumps. Lumpy fried rice is un-appetizing. Then make sure that your skillet/wok is hot.Just let your palm hover about 6" high over the skillet/wok, and when you feel the heat, then you're ready to start. And be ready to do everything quickly.
Sending a serving of this Spamsilog to Ces of SpiCes, as my entry to this weeks's Lasang Pinoy Sunday Edition #25.

Garlic Fried Rice
2 tbsp vegetable oil
2 c rice (see instructions above)
2 cloves garlic, minced
1 tsp soy sauce (opitonal)
freshly ground black pepper, to taste
fried garlic chips, for garnish
1. Set your skillet/work to high heat. When it's hot enough (see instructions above), add the vegetable oil.
2. Then add your rice. Stir the rice continously for about 3 mins. All you are doing is warming through the rice. Add more vegetable oil if you think your rice is dry.
3. Then add the garlic, followed by the soy sauce and pepper. Stir for 1 more minute.
4. Turn off the heat. Serve topped with garlic chips, if you like.
There are rumblings in our kitchen, but alas, what could cause such a stir? Or perhaps a mix, such as this? LOL....
Today was a day just like most other at work, except for the sound of a UPS truck, and a rather small driver comparative to the large package he was carrying --- with my name on it. But what could be inside?
As the driver unloaded the package, a quick glance proved my suspicions were true! The kitchen gurus have spoken and a new KitchenAid Pro mixer has arrived. My mind was in a tizzy as I began to daydream about all of the stuff I could create with this appliance at my disposal. My officemates were quick to interrupt the fiesta I had going on in my cabeza (head) by mentioning that the 6-quart mixer was simply "too big" to be of use for my husband and I. But I know that time in all of its fullness will invariably prove them incorrect. Mr. J told me to start making tons of delicious food for ourselves and our friends, and in conversation mention, " hey, by the way, (I) made that with my new mixer"...LOL.
I will let these pictures and my future blogging tell the rest of the story.
Here's my new KitchenAid mixer in all of it's glory....


 I am so glad that the elections are over. It was a drawn-out spectacle that left me really spent at the end of it all. It’s not just because the candidate I voted for didn’t win. It’s more because I’ve never been so much into all the drama that was the Elections ’08. In the last few weeks before the Election I felt burned-out; I wanted for everything to be over and done with. So you can just imagine how much anticipation I had on Election Day knowing that finally, the verdict will be revealed before the day ends.
Though disappointed of the fact that my candidate didn't make it, I have to admit that Obama’s triumph was a single event that changed the history of this nation. No doubt, it has impacted many a people’s lives not just in the US but all over the world. As I listened to him deliver his victory speech, I marveled at his charisma, that X-factor, if you may, that he possesses which attracted people to him, almost worshipping him like the Messiah. But more than that, I applaud him for all he has achieved. He has indelibly inked his name in history. My sincere congratulations to you, President-elect Obama.
Now, it is time to move on. I gladly wave adieu to all the political hustle and bustle that almost consumed me for a time. As a good citizen of this great nation, it is my responsibility to pledge support to our newly elected President in whatever capacity I can as an individual. I do hope and pray that he will have the wisdom that he needs to confront all the challenges that he will be facing when he takes office early next year.
Anyhow, enough about politics…….

Have you had those days when you want to eat something, yet you really don’t know what you want??? LOL… I had one of those days and that’s how this dish came about. I figured, I’ll just throw together my favorites (whatever I have anyways) and it should cure my unidentified craving. And I'm glad I did as this dish did really hit the spot!
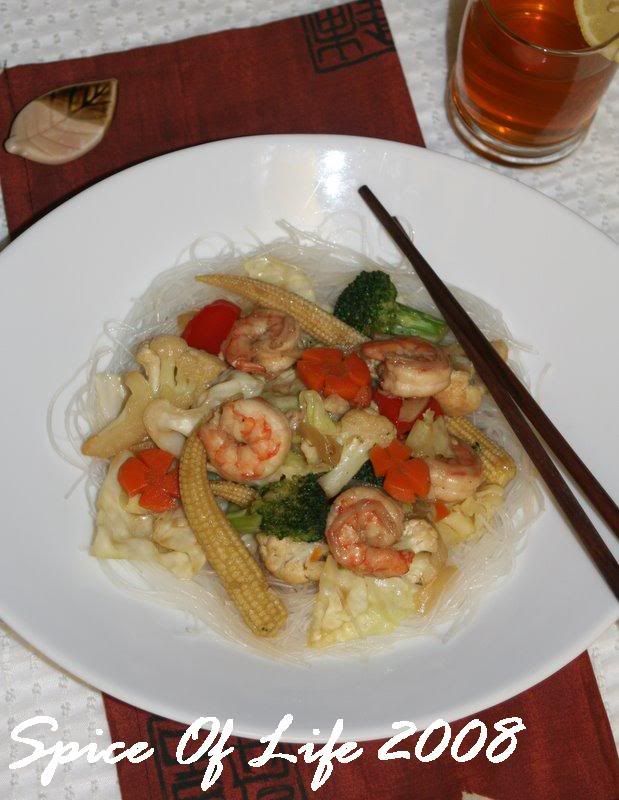
I’ve mentioned in my earlier blogs that Philippine cuisine is heavily influenced by many cultures, predominantly Spanish and Chinese. Well, this one is an example of a Chinese-Filipino dish called Chop Suey.
Chop Suey or “mixed pieces” in Chinese consists of just that – stir-fried mixed pieces of vegetables with meat. In the Philippines, our Chop Suey version traditionally includes cabbage, chayote, cauliflower, carrots, red bell pepper, snow peas, fish ball, wood ear mushroom, quail eggs, shrimp and either chicken or pork.
Well, my version here is slightly different in that I just used whatever veggie I had on hand. Also in the Philippines, we usually eat this with plain boiled rice, but this time, I thought of pairing it up with cooked vermicelli (bean thread) noodles, chow mein style.
Let me tell you, this is certainly better than take-out. Any day. Any time.
Chop Suey (as shown here)
3 cloves garlic, minced
1 small onion, diced
1 /2 c vegetable oil
1/2 lb med sized shrimp*
1 med carrot, cut to about 1/4" thick
1 c cauliflower, cut into bite-size pcs
1 c broccoli, cut into bite-size pieces
1/2 c red bell pepper, cut into thick strips
8 oz fresh baby corn (or 1 8 oz can)
1/2 head of cabbage, cut into bite-size pcs
1 tsp of soy sauce (or more)
1 tbsp oyster sauce (or more)
1 tsp sugar
1/2 c water with 1 tsp of cornstarch
salt and pepper to taste
drizzle of sesame oil
1. Mix together the water, cornstarch, oyster sauce, sugar and soy sauce.
2. Heat a wok or skillet. Pour in about 2 tbsp of the cooking oil. Heat to smoking point.
3. Fry the carrots for 1-2 minutes. Remove with a slotted spoon, drain and paper towels and set aside. Repeat this process for the cauliflower, broccoli, baby corn, red bell pepper. Keep adding the cooking oil bit by bit as you saute your veggies, but set aside 1 tbsp.
4. When all the veggies have been stir fried, then add the last 1 tsbs of your cooking oil. Saute the onions till transluscent, and then add the garlic. Stir for 30 seconds. Then add the shrimp (or whatever meat you're using).
5. As soon as the shrimp turns pink (or your is meat cooked), return all the veggies to the wok/skillet, including the cabbage. Stir.
6. Then add the the cornstarch mixture. Stir until the sauce thickens and clears.
7. Adjust seasoning to your liking at this point. Add oyster sauce, if you want.
8. Season with pepper but be cautious with salt. Remember, the soy sauce and oyster sauce are already salty.
9. Turn off heat. Drizzle Chop Suey with sesame oil just before serving.
10. Best served warm, with rice or boiled vermiccili noodles.
* You may substitute shrimp with chicken or pork cut into bite-sized strips. To make a vegetarian version, substitute shrimp/meat with firm tofu cut into squares. I suggest marinating your tofu with soysauce for more flavor. Then saute tofu until golden brown.