Sunday, July 6, 2008

Coleslaw Salad


This post is sort of a continuation to my previous post, which was about our July 4th celebration. As mentioned to you, my hubby and I decided to grill some rib-eyes, and I prepared this side salad.

Like I said, this coleslaw was inspired by KFC. I've always liked how they prepared the coleslaw, so I wanted to make an imitation of theirs. I've browsed through the internet for recipes, and I was so surprised that there's a lot that came up as a result of my search. I compared a lot of the recipes that I found and noticed that most of them have similar ingredients, only the ratio varies just a tiny bit. So, I decided to make my own version.

The salad is a breeze to make, mainly because I also decided to use the pre-shredded mix in the bag. Of course, nothing beats fresh ingredients from the market. But for working wives like me, or if you're pressed for time, those pre-washed, bagged salads are a huge help.

Anyway, the following recipe is more like a method than anything else. Please feel free to adjust the ingredients' ratio, according to your preferences. The measurements I gave below are all an approximation, as I eyeballed everything, and tasted the mix every now and then until I've convinced myself that I've come close to KFC-coleslaw taste that I was trying to achieve.

Coleslaw Salad

1 small onion, finely chopped
1/2 cup mayonnaise
1/4 cup milk
1/4 cup sour cream
2 tbsp white vinegar
1 lemon, juiced
3 tbsps granulated sugar (more or less, depending on your taste)
1 bag of pre-shreddix coleslaw mix (or approx 1 head shredded cabbage, 3 medium sized shredded carrots)
1/4 kosher salt
1/4 freshly ground pepper

1. In a bowl, mix the first 5 ingredients, from onion thru lemon. Let it stand while you shred the vegetables. (Skip this if using the pre-shredded mix)
2. Add the vegetables to the mixture. Toss until dressing is well incorporated. Season with salt and pepper.
3. Cover the salad with plastic and let it rest in the fridge for about 2 hrs before serving.


Friday, July 4, 2008

Grilled Rib-Eye & July 4th


July 4th, a reminder of America's independence and freedom as a nation and as a people. It is a reminder that FREEDOM is certainly not FREE. Great men who went before paid a great price so that Americans can enjoy the kind of liberty that they have today. So, I pay homage to the great leaders such as Thomas Jefferson, and all those brave men and women who fought for their vision of "a land for the free" to come into a reality. As well, I'd like to thank all those soldiers who are in the battlefront defending this country and the principles it stands for. Thank you so much for putting your lives on the line. God bless you, God bless America!

With that said, I am also thankful that July 4th is a non-working holiday. It fell on a Friday so we have a 3-day weekend. Yipee!! But my hubby and I both have no family in Florida, our best friends are in South Africa (as missionaries), and gas is so crazy expensive to drive anywhere --- so we had nowhere to go!! ... LOL. Actually, that's not entirely true. We do have other friends, but we just chose to stay in the house. We had a truly lazy day; we slept in and just watched pay per view movies. I do thank God that after all these years, we still find it a pleasure to hang out with each other.

But in a true July 4th tradition, we have to fire up the grill, right? So we did that in the afternoon. For our July 4th celebration, we choose to grill rib-eyes (hubby's fave cut of meat) and corn on the cob. I made coleslaw salad and had Bush's grilling beans. We also had garlic bread. Quite a spread for just the two of us, huh?

It's such a pleasure to collaborate with Mr. J. He likes mixing up spices, and that's just what he did for the steak. And after surveying what we have in the fridge and pantry, he also came up with a steak sauce - a mixture of horseradish, mayo and pineapple... Sounds weird huh? But it came out good. I'll tell you more about it as I explain to you how he made it.

As for me, we had coleslaw mix in the bag, so I decided to make a the coleslaw salad- KFC style. I've always liked KFC's coleslaw, and so, I tried to imitate that - which I think I did a good job of. It tasted yummy. But hey, you might say I'm biased because I made it. Well, you just gotta try it yourself, won't you now? For the beans... we'll we just had to try this new product. But since it's from the can, we didn't do a whole lot except added sauteed onions and a bit more seasoning to it.

It was a nice celebration. It was like going out to eat, except that we did not spend a lot. Plus, we have leftovers in the fridge
, so I don't have to cook anything for tonight. That's the way I like it! :o)


Recipes will have to follow when I get it from Mr. J..as for now, hope you had a good July 4th celebration as well.

Thursday, June 26, 2008

Buttermilk Biscuits

Photobucket

Here's a personal confession.

In the Philippines, biscuit or "biskwit" means, soda crackers, or crunchy cookies. Thus, naturally, I grew up believing that biscuit means the same in the US or elsewhere in the world. But little did I know that though it is spelled the same, outside of the Philippines, the word doesn't necessarily mean the same thing.


So when a franchise of Texas Chicken opened in one of the big malls in Cebu, the city in central Philippines where I come from, I was surprised to read that the menu includes: "2 pcs chicken with biscuit". Hmnn... I thought, "soda crackers with chicken? That's interesting!". So I made it a point to try, and when I did, I discovered that "biscuit" is actually a soft, round bread! And it tastes good too! That , ladies and gentlemen, was my first introduction of what "biscuit" in the western world is supposed to be.

Now that I'm based in the US, I've also discovered that what rice is to us Filipinos, is bread to the Americans. Americans (and Europeans as well)are major bread eaters, and would eat bread with everything. That's how Filipinos are too, with rice.

Well, I may have eaten countless biscuits since moving to the U.S., but I can never forget that very first biscuit encounter that I had in Cebu. That biscuit had a little honey on top that made it a bit sweeter... And to this day, that's how I like my biscuit... with a little honey and butter, reminiscent of my very first taste of this little yummy bread.

The biscuit recipe I have here is simple. The buttermilk makes this traditional Southern specialty especially light and tender. The recipe is supposed to make 12 biscuits, but since I used a 5-in cookie cutter which is slightly bigger than the usual size, I only made 8 pcs.
Photobucket

Photobucket

Buttermilk Biscuits
2 cups all purpose flour
1 tbsp baking powder
3/4 tsp salt
1/2 tsp baking soda
5 tbsp chilled butter (or solid vegetable shortening)
1 cup buttermilk

1. Pre-heat oven to 425 degrees F.
2. In a large bowl, sift together flour, baking powder, salt and baking soda.
3. Using a pastry blenderor 2 knives, cut the shortening into the flour mixture until coarse crumbs form. (or you can do this in the food processor too)
4. Turn dough out onto a lightly floured surface. Gather into a disk. Knead lightly a few times just until smooth. (Dough can be made up to 2 hrs ahead, wrapped in plastic wrap and refrigerated until ready to use)
5. Pat the dough to 3/4-in thick. Using a biscuit cuttter or a glass dipped in flour, cut out biscuits. Place the biscuits, 2 in apart, on an ungreased baking sheet. Gather dough trimmings, pat to 3/4-in thick and cut out more biscuits.
5. Bake the biscuits 12-15 mins, or until golden brown. Serve hot.

NOTE:
For flaky biscuits, take care not to overhandle the dough. For less waste and speedier preparation, pat the dough into a square form, then cut into square shapes with a floured knife.


Sunday, June 22, 2008

Chili-Glazed Tofu Over Asparagus And Rice

Photobucket

Every once in a while I do try to experiment and cook something vegetarian. Mr. J and I both like to watch what we eat, and vegetarian dishes make us feel like we could eat more and still feel not guilty at all.

Unfortunately, the word "healthy" in food has not always been associated with "tasty". It is only in the past few years, when different diet plans began to emerge and the organic-food revolution came about that the mindset about healthy food has changed -- that healthy could also mean flavorful, tasty food, afterall.

Well, here's one such recipe. Mr. J and I both like tofu, so this recipe is perfect for us. And instead of using white rice, I decided to use organic brown rice that has more fiber -- for good measure. Hmmn... the tofu was sweet and spicy- perfect for a light dinner. Trust me, with this dish, you won't miss meat at all!

This recipe would also be my very first entry to Fat Chef or Skinny Gourmet, a food event hosted by Ivy of Kopiaste and Ben of What's Cooking focused on diet or low-calorie foods.
Photobucket

Photobucket

Chili-Glazed Tofu Over Asparagus Rice
2 cups brown rice (I used organic brown-wild rice mixture)
2-1/4 cups asparagus, chopped 1 in. (about 1 lb)
2 cups water + pinch of salt
1 tbsp peanut oil
1 tbsp sugar
2 tbsp rice vinegar
2 tbsp low-sodium soy sauce
1 tsp fresh minced ginger (or bottled)
1 tsp hot chili-garlic sauce
1 lb extra firm tofu, drained and sliced to about 1/4-inch thick

1 tsp salt, divided
1/4 tsp black pepper
3/4 cup shredded carrot
1 tsp dark sesame oil

1. Cook brown rice according to package directions.
2. In another pot, bring 2 cups water to a boil. When boiling, add a pinch of salt and the asparagus. Cook 1 minute.
3. Take asparagus out of the hot water and straight into an ice-cold water to stop the cooking process. Let aspargus stay in water for 3 minutes. Drain and dry.
4. Combine sugar, vinegar, soy sauce, ginger and chili sauce in a small bowl.
5. Slice tofu to about 1/2 thick. Dry tofu by putting it in between paper towels and pressing it a little bit using the palm of your hand.
7. Heat peanut oil in a skillet. Sprinkle tofu with 1/2 teaspoon salt and pepper. When oil is hot, add tofu to pan, cook 3 minutes on each side until brown.

8. Add soy sauce mixture; cook 20 seconds, stirring constantly. Remove from heat.
9. Combine rice, asparagus, 1/2 tsp salt, carrott and sesame oil. Serve tofu over rice.

Saturday, June 21, 2008

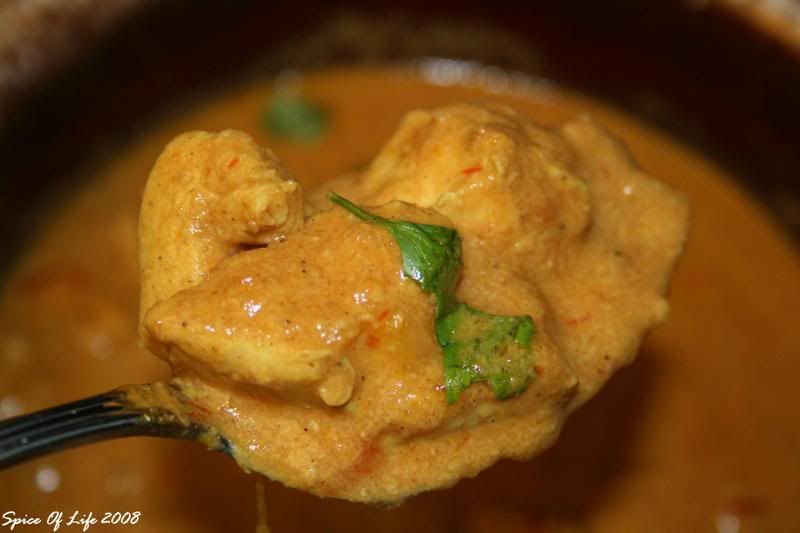
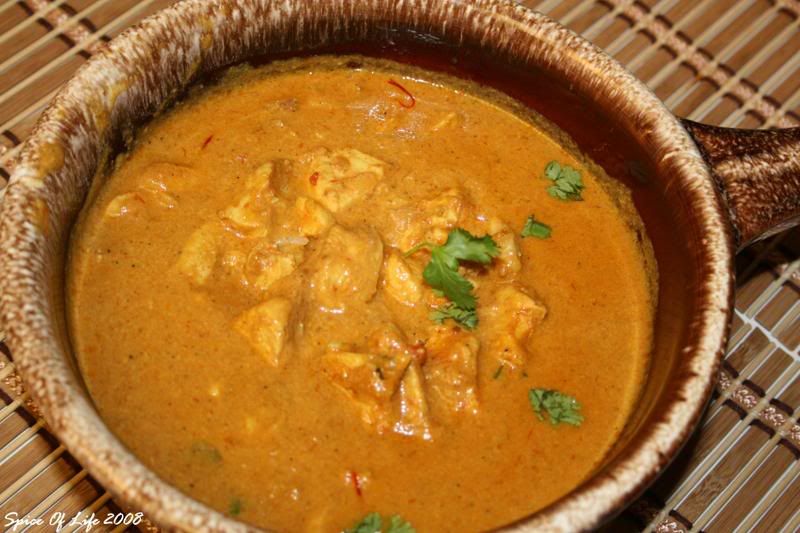
Taste & CreateXI: Chicken Cooked In Yoghurt (Dum Ka Murgh Zafrani)

It's that time of the month again. Time for Taste & Create, a monthly blogging event where partipating bloggers are partnered off with one another; the partners browse each other's blog and then they each have to cook their recipe of choice from their partner's blog. Cool huh? This blog was authored and is hosted by Nicole of For The Love Of Food.

My partner this time is Swati of Chatkhor. She's from Bangalore, India and so naturally, all of her recipes are for Indian food. She is a vegetarian, but she's started to venture into cooking chicken for her non-veg hubby. I'd say that's love right there. I enjoyed reading her posts. I can tell she's a fun person, who enjoys cooking so much. And her personality is obviously reflected in her cooking too. Swati, it's a pleasure to be partnered with you.

Now, what to cook? Obviously, we are not vegetarians, but I do cook vegetarian dishes once in a while. There are a number of recipes that I want to try from the blog, but unfortunately, a lot of the the spices the recipe call for are something that I doubt I'd be able to get here in Miami, as I don't know of any Indian specialty store around here. I also don't know what to substitute them with...
So in the end, I decided to do the recipe that Swati herself suggested - dum ka murgh zafrani, or chicken slowly cooked in yoghurt (check out the recipe here)... Doesn't the Indian title alone intrigue you?

Looking at the recipe, I knew right away that it would be a very rich dish. What with all that butter, yoghurt, milk and cream required... whew! So I had to tweak the recipe, just to control the fat content just a little bit. First of all, I used a skinless, boneless chicken breast. We usually don't eat the chicken skin anyway so there's no point in having it in this dish. Also, instead of using 1 cup of clarified butter as called for, I decided to only use 2 tbsps of butter, mainly for flavor, and a couple tbsps of olive oil. For the milk, I opted to use 2% instead of the full cream milk. Also, the yoghurt I used was non-fat. I had to do all these because Mr. J is watching his cholesterol level, so this is important if I were to feed him this dish. And for the fresh cream, I substituted it with heavy whipping cream using only half of what's required. And I have to admit.. I cheated a little bit too. I chose to use canned, peeled and crushed tomato instead of pureeing one from scratch. Not only did I saved a fraction of time, but I've also got lesser dishes to wash this way. I thought that was smart of me, wasn't it?
:o)

I don't think the changes I made affected the flavor of this dish at all. In my humble opinion, it's really all the spices that make this dish. The sauce still came out thick and creamy due to the addition of the almond paste and the pureed tomato. At first, I was kind of iffy about the almond paste. I thought almond paste is only for desserts. I never knew that it could be added on to savory dishes as well, but now I know better.. haha! The paste added a slight almond taste to the dish, but not overpowering. And it made this dish a bit sweeter as well, which is a nice balance to all the different spices going on in this food.


As it is only Mr. J and I at home, I decided to cut the recipe down into half. But even with half a recipe, it still made a lot, especially the sauce! But you know what, this food tastes better the next day, so I am not complaining.

Cooking this dish transported me back in time when I was hanging out with pals from New Delhi (India) and Katmandu (Nepal). Almost 10 yrs. ago, I was in a scholarship program in Germany, which was sponsored by the German government. I got close to my colleagues from India (there were 2 of them) and Nepal. The smell of this dish as it cooked made me remember those good ol' times when my friends would cook dinner, or at other times, when we would have Indian theme nights. We would go out to eat at Indian restaurants (in Germany), and watch Indian movies afterwards. Oh, I miss those fun times with them. I still communicate with these friends up to now, actually.

Anyways, before I get carried away too much..... This dish is similar to curry, except that there is no curry in it. It had all the spices that one would expect in an Indian dish. The chicken was creamy and dreamy and I served it with plain boiled jasmin rice garnished with cilantro... Yum! My husband, who thought it was spicy, was surprised because the dish is milder than he had expected and slightly sweet. He actually liked it...Life is good.... Thanks, Swati, for a great recipe!

Saturday, June 14, 2008

Zucchini And Squash With Basil And Feta

Photobucket

The most rewarding part about cooking is seeing people enjoy your food. I'm sure anyone who cooks would agree with me on this, am I right? What I struggle most about it though, is putting a menu together. Well, if I went to culinary school this story would have been different but I didn't. I just have to learn this area vicariously through restaurants, TVs and magazines while relying a lot on my (and Mr. J's) tastes buds.

Personally, I am not picky and in the least bit particular about the pairing of my food. My philosophy is, it will all get mixed up in your stomach anyway. Thankfully, Mr. J is not picky as well. He's game, he'll try anything. I'm proud to tell you that he's even tried eating "bulad" - the dried, salty fish in the Philippines, which a lot of foreigners find really repulsive (it has a strong fishy smell when being cooked). I still have to convince him to try our world famous "balut" delicacy though, or the fermented duck's eggs with the embryo in it. Hahahah.. sorry if I gross you out, but the truth is, a lot of people in the Philippines enjoy this delicacy. (I don't though, so that's why I don't have the right to push Mr. J to try it himself) Balut is supposed to have a lot of nutrients and is believed to be an aphrodisiac as well. Hmmmn..

Back to my food today. When you're a career lady, the last thing you want is to spend a long time in the kitchen when you get home from work. I don't know about you but I don't. Much as I like to cook, when I 'm from work I just want to relax. That's why if you notice, majority of my recipes are simple and quick to do but without sacrificing the taste.

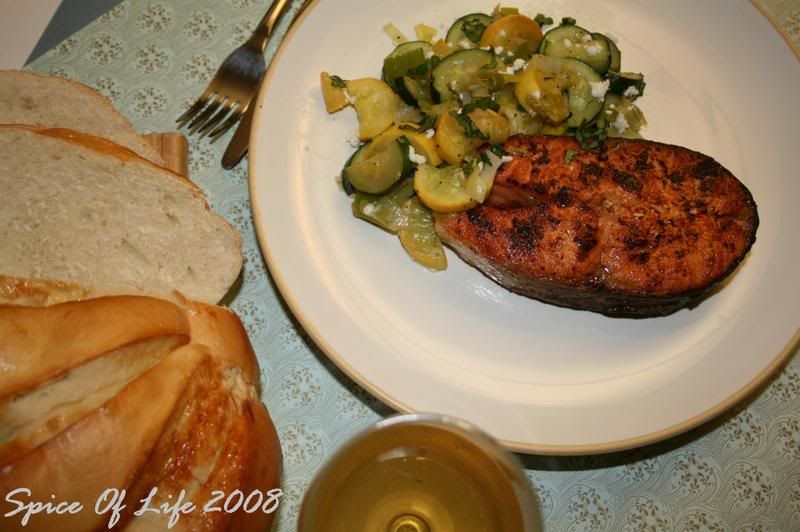
So here's a simple side dish that is quick, flavorful and healthy. I served it with a blackened salmon steak cooked in a cast iron pan. Hope you like it.


Photobucket
Zucchini And Squash With Basil and Feta
Adapted from Cooking Light

1 tablespoon olive oil
1 tbsp unsalted butter
2 cups zucchini, sliced
2 cups of baby pattypan, halved
2 cups leeks, sliced (about 2)
1/2 tsp salt
1/8 tsp freshly ground black pepper
3 tbsp feta cheese, crumbled
2 tbsp fresh basil, cut into strips (chiffonade)

1. Heat a large non-stick skillet over medium high heat. Add oil and butter to pan, swirling to coat.
2. Add squash/zucchini and leek to pan; saute for 5 minutes or until tender, stirring frequently.
3. Stir in salt and pepper.
4. Transfer squash mixture to a serving platter. Sprinkle with cheese and basil.

Salmon
1. Sprinkle salmon steaks with salt and pepper on both sides.
2. Heat your cast iron skillet to medium high. Add about a tablespoon of oil, just enough to coat the pan to make sure fish does not stick.
3. When skillet is hot, add the fish. Fry 4 mins on one side or until done. Do not overcook or salmon will get dry.
4. Serve with lemons, if preferred and the side dish above.


Saturday, June 7, 2008

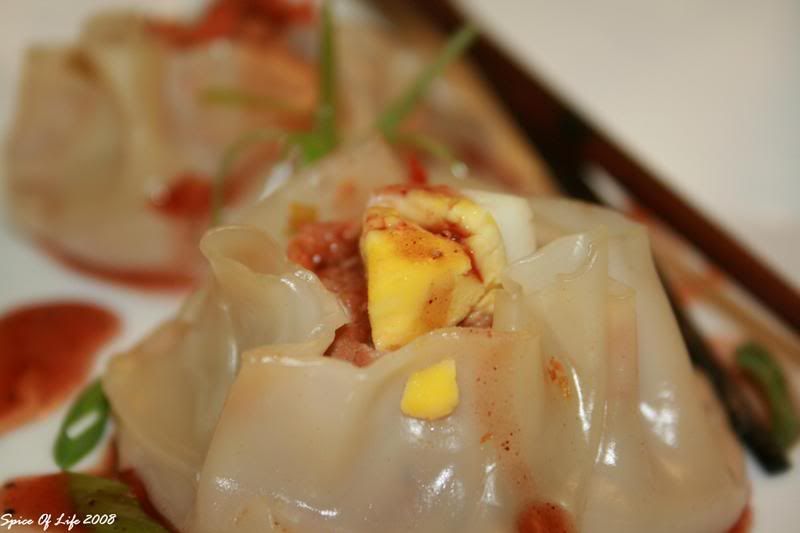
Steamed Pork Wonton Dumplings (SioMai)


SioMai (shoo-mai) commonly known as steamed dumplings, is one of the dishes brought to the Philippines by the Chinese immigrant, Ma Mon Luk. I told you about his inspiring story two posts ago. If you didn't get to read it, check it out here.

This food is a dimsum staple in China or Hongkong. What I like about this dish is the fact that it is steamed. Steaming leaves the ingredients' essential flavors and textures intact. Also, it is a healthier way to cook, yes?. It does take lot of time to prepare, so as a warning, do this way ahead of time when your tummy has not began churning yet. The actual steaming of these wonderful little bites don't take time, it's the stuffing and wonton wrapping action that does require a bit of patience.

As you know, Asian cuisine is characterized by a lot of chopping, dicing, wrapping or rolling. Really, it's the preparation part that is more time consuming than the actual cooking in itself. But hey,if you love Asian food, then it's going to be worth your effort.


You can serve these dumplings as appetizers, but my hubby and I often eat these for dinner, with a simple noodle soup perhaps. These yummy little things are light but filling.

The recipe below really is for you to learn the method more than anything else. These dumplings are so versatile that you can change up anything from the meat, to the vegetables and the topping.

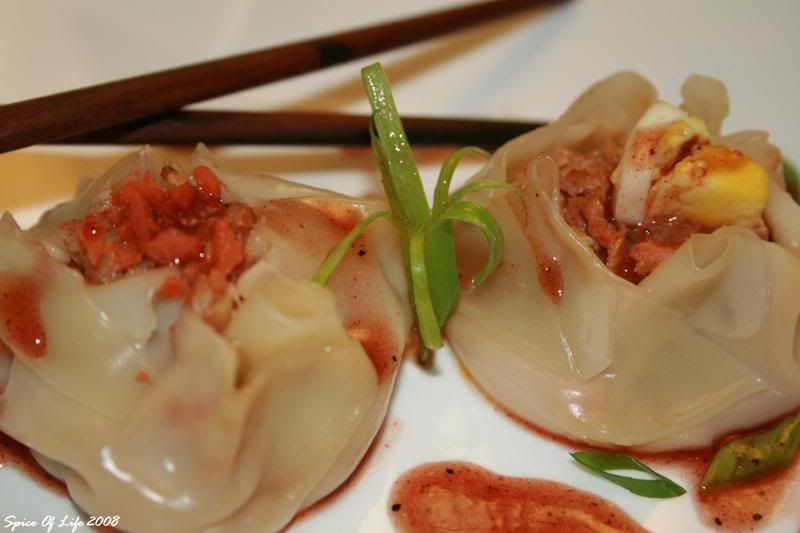
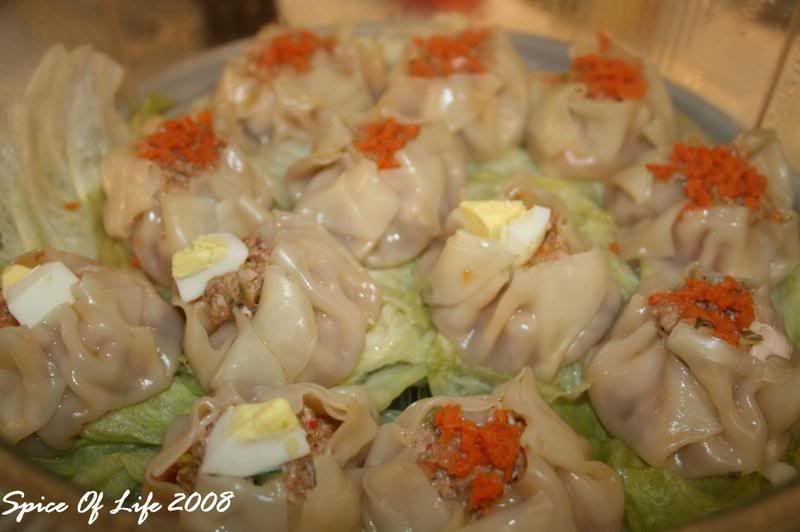
Here, I used shredded carrots and boiled eggs as toppings. But you can also use shrimps, mushrooms, crabmeat, chopped scallions or quail eggs, or anything that might strike your fancy.

You can eat these with or without the dipping. But I love dips and sauces, so I chose to make a simple dip to go with my dumplings. There are many options to use as a dipping sauce. There is the bottled Thai/Chinese sweet chili sauce, or just the Hoisin sauce. What I did this time is a mixture of Hoisin sauce thinned out by a bit of lite soy sauce, and I added a bit of the garlic-chili paste for a little kick. If you want your sauce to be a little bit sweeter, you can either add more Hoisin, or add just a touch of honey.

Steamed Pork Wonton Dumplings
1 pound ground pork
1/2 cup carrots, shredded
1 (5 oz) can water chestnuts, strained
1/4 cup scallions, coarsely chopped
2 cloves garlic
1 tbsp fresh ginger, coarsely chopped (about 1-inch size)
1 tablespoon sesame oil
1 egg, beaten
2 tbsp soy sauce
3 tablespoon oyster sauce
1 tbsp chili-garlic sauce (optional)
1 (16-ounce) pack wonton wrappers
Savoy or Napa cabbage for lining *

1. Throw in the food processor the carrots, garlic, ginger, chestnuts. Pulse a few times until vegetables are finely minced. You can also do the mincing by hand. The important thing is that thye veggies are minced finely.
2. Pour the processed vegetables in to a large bowl. Add the scallions, sesame oil, egg, soy sauce, oyster sauce and chili sauce (if using). Mix well.
3. Add the ground pork to the bowl and mix thoroughly, making sure that the spices and veggies are thoroughly incorporated. Do not overmix meat.

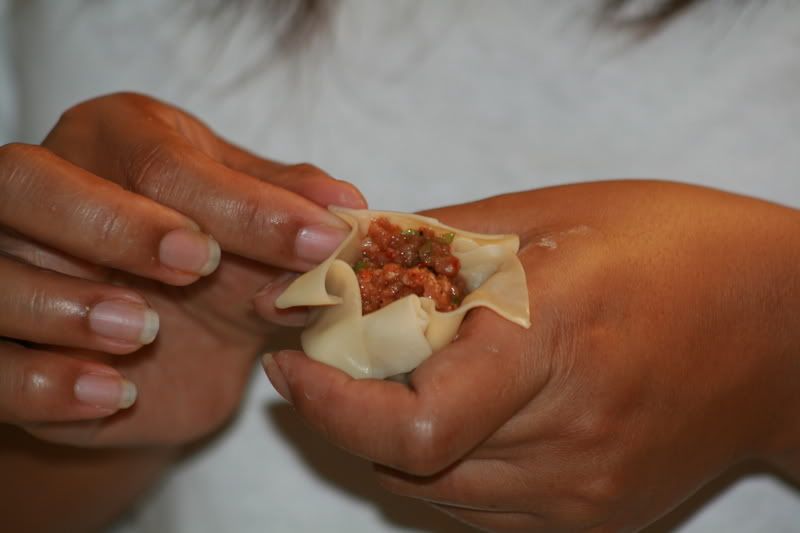
4. Working with one wonton wrapper at a time, (cover the rest with a damp paper towel to prevent from drying), spoon about 1 tsp meat mixture to the center of each wrapper. Moisten the edges with water.
5. Gather up and crip the edges of the wrapper around the filling; lightly squeeze to adhere to filling, leaving top open. Place your topping on top and gently press into the filling. Place dumpling on a baking sheet; cover loosely with damp towel. Repeat procedure.
6.Line your steamer with the cabbage leaves. Arrange dumpling over the leaves, 1 inch apart
7. If using a bamboo steamer, add water to skillet,about 1 inch deep; bring water to boil. Place steamer in pan and steam dumpling for 15 minutes or until done.
8. Remove dumplings from steamer. Serve warm with the dipping sauce. Discard cabbage.

*NOTE: Lining the steamer with cabbage leaves ensures the dumpling won't stick to the bottom of the steamer.