Showing posts with label food event. Show all posts

Saturday, April 4, 2009

Gelato di Riso (Rice Gelato), Homemade

Photobucket
“We gotta go to Vivoli!”, my friend Monica insisted.

According to her trusted travel resource,
Rick Steve’s Travel Guide, Monica informed us that Vivoli is said to make the best gelato in Florence, or in Italy for that matter. And Rick recommends trying the rice gelato.

"Rice ice cream?” I said, “never heard of that before! But rice + ice cream together? What’s not to like? That must be good".

Monica didn’t have to convince the group any further. Off we went to find Vivoli.

This conversation happened many years ago one summer. A couple of my colleagues and I decided to spend our summer break in Italy while being student-trainees in Germany. We were the typical student travellers – backpacking and staying in youth hostels. We really didn’t have that much money but we made the most of what we had. We met Monica while in Verona (of famed Romeo & Juliet), our first leg of the trip. Since she was traveling alone, she decided to hook up and tag along with us. So we were together in the next 4 weeks exploring Italy and became fast friends. Those were good times – no, best times.

It was in our stop in Florence that Monica mentioned this Gelateria that is a must-visit according to Rick Steve. (Rick Steve’s is a good resource when it comes to budget travels!)

After a bus ride and a lot of walking, we finally managed to find Vivoli. It was a small Gelateria, but boy, was there a long line outside of the shop! Not surprising though, because if it is the best Gelateria in Florence, then it follows that the place should be popular. So we fell in line. It must have taken us around 30 minutes to finally get our turn. Not bad, really. We were on vacation so time was on our side.

Needless to say, I had my Gelato di Riso for the very first time then. And I’m telling you, that was a piece of heaven in a cup (they don't have cones)! Yum'oh! It was so creamy, not too sweet -– everything that you had hoped a gelato would be – but with rice! It’s like a frozen rice pudding, but better! Indeed, our efforts paid off.
Photobucket
Last month, I got an ice-cream maker. It was one of those points-reward that Mr. J got from his job – so we got it for free! I love free stuff, don't you? Of course I wanted to make ice-cream immediately to try my new toy. For others, the logical thing to do might have been to make something basic for the first time. Something that’s probably from the recipes that come with the manual. But no, I am not like that. (Yeah, I’m crazy). I wanted to do something ambitious. I wanted to do something simple -- but not that simple, you know what I mean? (If you're a girl, then you'd know what I mean!)

So just out of nostalgia from that trip in Italy – and because I am Asian – I decided to make rice gelato. It had been many years ago since I had this ice cream. I don’t remember exactly how the taste was but all I know was that it was very good!
Photobucket

And so I began searching online for some recipes, which eventually led me to David Lebovitz’, The Perfect Scoop. This recipe book received so many good reviews from Amazon buyers, and most of all, it had the Rice Gelato recipe that I was looking for!!!! So that sealed the deal. I bought a copy.

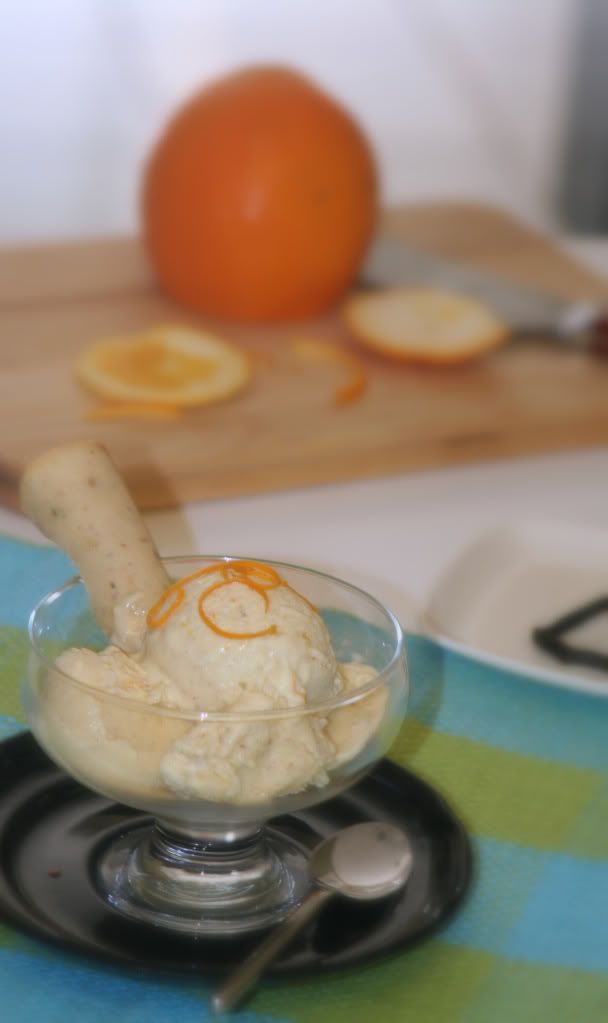
After so many years, I had rice gelato again! It was creamy, super delicious. The only complaint Mr. J had was that it was too "orangey" - which was my fault. If you read the recipe, it required two strips of orange zests. Well, I made a mistake of pureeing the zests with the rice mixture (wasn't really a mistake because I decided to do it). Plus, I also added a teaspoon of orange liquour. So you can really taste the orange in the ice cream. Mr. J found the orange taste overpowering - maybe so - but I liked it. With the ice cream I made the hazelnut tuile cookie, that I shaped using the wooden handle of a spoon (for that cigar shape).


This rice gelato is my entry to this weeks' Lasang Pinoy Sunday (La.Pi.S) - Melted Bliss. Eating this ice-cream took me back to Italy..... What a bliss, indeed!

Photobucket


Rice Gelato (Gelato di Riso)
David Lebovitz

1/2 cup Italian Arborio rice*
3 cups whole milk
3/4 cup sugar
pinch of salt
1 vanilla bean*, split in half lenghtwise
Two 1-inch-wide strips of orange zest
5 large egg yolks (save the whites for use later)
1 cup half-and-half or cream
Pinch of freshly grated nutmeg

1. Preheat the oven to 350.

2. In a 1.75 to 2 quart baking dish, mix together the rice, milk 1/4 cup of the sugar and the salt. Add the vanilla bean and strips of orange zest.

3. Cover the dish with aluminum foil and bake for 1 hour. Remove the rice from the oven and remove the foil. Stir in the remaining 1/2 cup sugar, then continue to bake the rice, uncovered for another 30 minutes.

4. Remove the rice from the oven a second time, remove the vanilla bean and orange zest and briskly whisk in the egg yolks at once. Then whisk in the half and half or cream and nutmeg.

5. Puree half of the rice mixture in a blender or food processor until chopped fine then stir it back into the cooked rice.

6. Chill the mixture in the fridge (I left mine for 2 hrs), then freeze it in your ice cream maker according to the manufacturer’s directions.

*NOTE: I made mine 1/4 c arborio rice and 1/4 c sweet "gelatinous" rice, aka sticky rice. I thought that the sticky rice would make the ice cream a lot creamier, which it did. I didn't have a vanilla bean, but I used a good quality vanilla bean paste. But if you don't have the vanilla bean or paste, I believe that vanilla extract would do.

Sunday, March 8, 2009

Sweet Challah

Photobucket

This past week has gone by so fast. I couldn’t even believe that the weekend has come, and just as quickly, is gone. But you know what they say, when one is busy, one barely notices the time. I was defintely preoccupied at work. It was a pretty interesting week for me, to say the least. I wish I can engage you in an office gossip – but nah… LOL… you wouldn’t appreciate that in a food blog, would you now? ;oD

Anyways, I’ve always been a person who cannot sit still. I like to be busy. No, I thrive at being busy. I am always doing something even when I am sitting down. I’m the type who’s ever on-the-go and always ready to rock and roll, so to speak. I’m used to last minute changes and I adapt immediately to situations when need be.

The downside of this is that it isn’t easy for me to relax, and by this I mean, to just sit down and do.... nothing. I feel like there is always something important for me to do with my time. I have to deliberately slow down. Mr. J is very good at reminding me of this (thank God). I realize that I do need to take a break once a while. It is indeed important to take the time to appreciate the things around us, to enjoy and take in what we have at the moment, otherwise, we might miss out on a lot (and it might be too late when we realize that we did).

Anyways, enough about my rambling.

Photobucket

I love bread. Growing up though, I wasn’t so much of a bread eater. As you know, being Asian means that my house had more rice and noodles than bread. In the Philippines, the only meal served with bread is breakfast (pan de sal). Other than that, bread is more of a snack item to Filipinos than anything else.

However, my short stint in Europe years ago, and now being based in the U.S., have slowly changed me. I’ve come to eat bread with my meals more and I don’t crave rice as much as I used to. (Ugh. I can almost hear the gasp of some Filipinos who may scream “sacrilege!” )

I love to bake bread. Nothing compares to that sweet aroma that tantalizes our senses when baking at home. Unfortunately, with all the hustle and bustle of life, I rarely get the chance to bake them--- and I mean bake ’em in the old fashion way of kneading and manhandling the dough! Hehehe…. (It’s a good stress reliever, actually).

Photobucket


One of the breads that I love eating is Challah (pronounced “khal-lah” - you gotta make that gutteral sound too). Challah is a braided, eggy loaf of bread traditionally eaten by Jews during Sabbath, holidays and other ceremonies. It is very close to the French brioche.

I decided to make Challah for the first time. I buy it all the time so might as well try my hand at it. It came out good, didn't it? With a bit more practice, I'll have the braiding part down in no time.

Nothing beats home-made breads. They’re the best.

Sharing this home-made Challah to Lasang Pinoy Sunday: Bready Or Not. Lasang Pinoy (La.Pi.S) is a weekly food thematic photography meme, Filipino style.

This is also my entry to Homemade#2 Bread, an wonderful event by Ben. Hop over to there to check out all the wonderful creations by other home bakers.

Sweet Challah
from Cooking Light
1 package dry yeast (about 2 1/4 teaspoons)
1 cup warm water (100°F to 110°F)
3 tablespoons honey
Dash of saffron threads, crushed
3 tablespoons butter, melted and cooled
1 teaspoon salt
1 large egg
3 cups bread flour (about 14 1/4 ounces), divided
Cooking spray
1 teaspoon cornmeal
1 teaspoon water
1 large egg yolk, lightly beaten
1/4 teaspoon poppy seeds* (I used more than this amount)

Preparation
1) Dissolve yeast in 1 cup warm water in a large bowl; stir in honey and saffron threads. Let stand for 5 minutes. Add melted butter, 1 teaspoon salt, and egg; stir well with a whisk.

2) Lightly spoon flour into dry measuring cups; level with a knife. Add 2 3/4 cups flour to yeast mixture, and stir until a soft dough forms. Cover and let stand for 15 minutes.

3) Turn dough out onto a lightly floured surface. Knead until smooth and elastic (about 8 minutes); add enough of remaining flour, 1 tablespoon at a time, to prevent dough from sticking to hands (dough will be very soft).

4) Place dough in a large bowl coated with cooking spray, turning to coat top. Cover and let rise in a warm place (85°), free from drafts, 40 minutes or until doubled in size. (Gently press two fingers into dough. If indentation remains, the dough has risen enough.)

5) Punch dough down. Shape dough into a ball; return to bowl. Cover and let rise an additional 40 minutes or until doubled in size. Punch dough down; cover and let rest 15 minutes.

6) Divide dough into 3 equal portions. Working with 1 portion at a time (cover remaining dough to prevent drying), on a lightly floured surface, roll each portion into a 25-inch rope with slightly tapered ends. Place ropes lengthwise on a large baking sheet sprinkled with cornmeal; pinch ends together at untapered ends to seal. Braid ropes; pinch loose ends to seal. Cover and let rise 20 minutes or until almost doubled in size.

7) Preheat oven to 375°.

8) Combine 1 teaspoon water and large egg yolk, stirring with a fork until blended. Uncover loaf, and gently brush with egg yolk mixture. Sprinkle evenly with 1/4 teaspoon poppy seeds. Bake at 375° for 30 minutes or until loaf sounds hollow when tapped. Cool on a wire rack.

*NOTE: You may also leave the poppy seeds out, or substitute with sesame seeds, or maybe use sunflower seeds for that matter.


Monday, July 21, 2008

Taste & Create XII: Ginger Cookies

It's really true. Time flies by so quickly when we are busy. I've had a full plate at work and at home lately, so it seemed just like a few days ago when I received the information on who my partner was for this month's Taste & Create... and before I knew it, I am a few days away from the deadline! Fortunately, I already know what to do and I got the ingredients on hand, so all I really had to do was to make time to do it! Nike's got it -- just do it!

For this month's Taste & Create, I am partnered with Divya of Dil Se. Divya is of Indian (Asian) descent. She, like me, somehow found her way here to the U.S. She is based in California, which is a melting pot of different cultures from all over the world. No wonder why her blog reflects this mix of Indian as well as American/Western cuisine.

It was easy for me to decide which one to do for the event. When I saw this in Divya's blog and read the recipe, it made my mouth water. That's a good sign, isn't it? So, I thought no further... Ginger Cookies it is!

Ginger is one of the most common spice for Asian cooking. The root has a strong, pungent flavor, while the dried/powdered ones have this sweet-spicy smell to it. A lot of Westerners do not really like it, or can't stand much of it in a dish. The flavor is indeed very strong when one is not used to it.

As for me, I grew up with it, so I love its flavor. Ginger also happens to have lot of medical benefits as well. In the Philippines, we have a traditional drink called "Salabat" which is made from boiling ginger roots in water (with a bit of sugar). I remember my Mom used to make this concoction for me whenever I get colds. Just try and see how effective it is. And hey, drinking salabat has a side benefit. It is supposedly good for your singing voice! So whether you're a professional singer or just a huge Karaoke singing enthusiast (like most Filipinos are), I urge you to try this and see if you won't be belting out tunes in no time. Hahaha.. (How about that, Susan of SGCC?)


While I love ginger in savory dishes, I love it in sweets just as much. For instance, gingerbread. I love this holiday treat but I've never gotten around to try baking one from scratch. And I thought that this cookie might have the same taste as that of gingerbread, so I decided to do it.

The recipe was easy and very simple. There was nothing more that I did to it; I simply thought of adding cyrstallized (candied) ginger on top for more flavor (and for looks too).

And boy was I right. The cookies have the same flavor going on as gingerbread with the combined spices of cinnamon, ground cloves and the ginger in it. The ginger candy at the center gives you that nice sweet-spicy-chewy bite that's just enough to give this cookie a little kick. Hmmmn.... the flavors of Christmas -- they're happy flavors!

Next time maybe, I'd minced the candied ginger and mix it in the batter so there'll be little specs of ginger goodness all throughout the cookie... what do you think?

This recipe is definitely a keeper. I will for sure be making lots of these come Christmas holidays. Thanks, Divya for a great recipe. No wonder why you love these cookies! And I love 'em too.

Maybe this will be Santa's new favorite cookie too?

(Taste & Create is a monthly food event created by Nicole of For The Love Of Food. Bloggers are paired off with one another and they have to do a recipe of their choice from each other...and of course, blog about it!)