Saturday, March 23, 2013

Ricotta Pancakes, Hotcakes!


I have been such a slacker. I know. I'm not proud of it.

You don't know how many times I've attempted to post something new. I know my blog had been looking pathetic. I look at other blogs and marvel at how they are able to find time to update their blog consistently.  Am I the only one slacking here or what?  I have to get better at this.  If others can do it, so should I.   So.Help.Me.God. :)

Anyhow, I am here and I have something for you.  My ricotta pancakes.


 In the Philippines, we actually call pancakes as "hotcakes". I don't know why but maybe because they're best eaten hot and fresh from the pan?  Hmmmm.

Making pancakes for me evokes a lot of childhood memories.  My Mom taught me how to make pancakes from scratch at an early age.  She would often make this for my father who loves them, not just for breakfast but as an afternoon snack.  I remember that my father would simply sprinkle the cakes with a bit of sugar, roll them like a cigarette and eat them that way accompanied with a hot cup of coffee.

So you see,  making pancakes is near and dear to my heart.


This time though, the pancakes I made are not for my father.  Rather, I made them for the most wonderful staff at Metro Life Church.  Many blogs ago I mentioned that the hubby and I had gotten involved in our church's Hospitality ministry in which we have the opportunity to cook breakfast for the staff at least once a month.  Let me tell you, this ministry has helped us practice our craft. We so much enjoy doing it.  We love doing it. We are so thankful for it.

A couple of Sundays ago was again our turn to prepare breakfast.  Earlier in the week, I had no idea on what to do.  All I know was that I wanted to do something simple and light.

The inspiration came to me later in the week.  I had been craving for lasagna lately and then...the idea hit me -- ricotta! Ricotta Pancakes. I know the addition of ricotta is going to make the pancake light. I shared my idea with Mr. J and he agreed. So that settled it.

I've made Tyler Florence's ricotta pancakes before but I thought his version had too much work and ingredients involved.  So I searched for something simpler to do, in which  my star ingredient - the ricotta - can truly shine.  Thankfully, I found the recipe below. 

So, here they are.  Pancake ricotta for the church staff.

RICOTTA PANCAKES

1 cup ricotta cheese
3/4 cup flour
1/2 teaspoon baking powder
1 1/2 tablespoons sugar
pinch salt
3/4 cup milk
3 eggs, divided
1/2 teaspoon vanilla

Whisk together flour, baking powder, sugar, and salt in a bowl. Combine ricotta, milk, egg yolks, and vanilla in a separate bowl.

Beat the egg whites in an electric mixer until stiff. Add the dry ingredients to the ricotta and milk mixture, stirring gently until just combined. Whisk in a small amount of the egg whites to lighten the batter, then fold in the remaining whites.

Heat a griddle over medium-high heat, and brush the surface with butter. Use a ladle or measuring scoop (we used a 1/3 cup measure) to pour batter onto the griddle. Cook pancakes for about 3 or 4 minutes, then flip, cooking until both sides are golden brown.

NOTE:  Serve your pancakes with fruit or maple syrup, and fresh fruits (berries would be the best).


Thursday, February 23, 2012

Swordfish ... on a stick!


Hello again, fellow food lovers!

It's definitely summer time here in South Florida. Never mind the snow and the chill on the other parts of the country, but here, the sweltering heat has already started!And what better way to announce the change of seasons than to get the grill fired-up and burn (ahem...cook) something that's skewered. For your viewing pleasure, we have taken some swordfish and assorted veggies and made some kebabs that eventually made it onto the grill.


First, find some really fresh swordfish steaks approximately 1/2-to-3/4 inches thick. The reason being is that this type of fish cooks-up really, really fast. So buy it thick, and keep a close eye on it while its on the grill. Next, you will cut the fish into cubes, and alternately skewer them along with whichever veggies you choose to use with this, keeping in mind that we eat with our eyes first. For this kebab, we used red onions and red peppers. Just be sure to cut them close to the same size as your swordfish cubes, so everything cooks at about the same rate. (Note: if you're using wooden skewers, soak them in water for at least 1 hour before using them, unless you want burnt skewers. If you're using metal skewers, then no problemo -- No soaking is necessary.)


You don't need a lot of seasoning for the fish, just the RIGHT seasoning. Some sea salt, fresh ground black pepper, garlic and lemon, and you're ready to start grilling. Get your grill going strong at roughly a medium flame, then oil up your grill and place your skewers down. I would say4-5 minutes per side and your done, unless you want it a little charred then go maybe 1-2 more minutes per side. Basting it with some melted butter while its still on the grill is an excellent way to do this "charring" as well. Be cautious and remember this fish cooks fast, and with the butter the flames will get hotter. Don't overcook it, or it will get dry and not taste so good. Flavor is what you're after!


There are many side dishes that would go well with this, but we chose to serve this over a bed of couscous pilaf.


Sunday, March 20, 2011

Halo-Halo


Spring is here! ... and yes, I'm back again.

You probably don't remember me anymore because I am the biggest slacker of all time, but I am hoping to correct that. I am making my resolution now, it's not to late to do so, is it? I will try to post as often as possible from here on. Cross my heart and... nope, I don't want to die, not yet anyway! Haha!

Well, spring in Miami is totally different than most cities in the US. For one, we don't really have an obvious change of seasons here as you probably know. It is hot here most of the time! Except for a few trees flowering during this time of the year, there's really not much difference from summer. Temperature is already in the 80's!

Which brings me to my post today. Halo-halo.

Halo-halo is the Filipino word for "mix". It is a traditional summer frozen dessert in the Philippines. For some reason, I have been craving for it these past few days... I blame it on the heat.


Halo-halo is very quick to prepare. It is really nothing but a melange of different fresh tropical fruits, cooked sweet beans with crushed ice, milk and sugar. It's a poor man's version of a shake, if I may say so.

But it's delightfully refreshing.


Above are the halo-halo that Mr. J and I enjoyed while lounging by the pool in a beach resort in Cebu, Philippines. The halo-halo was served in a young coconut shell which makes for a great presentation, and was perfect for Mr. J who loves coconut. As you can see, ice cream and chocolate fudge are added to the mix which made this particular halo-halo richer... and yummier! The whole mix was topped with a few corn flakes. Corn flakes??? Yes, the breakfast cereal! Sounds weird, huh? Maybe, but the flakes totally work, adding a crunchy texture to the whole concoction. Perfect.

You don't believe me? Well, I dare you. Try it and see for yourself.

You'll thank me later
.

Halo-Halo


Your choice of the following ingredients ( few or all of them)
1 ripe large banana
2 ripe or 1 canned mangoes
1 cup firm gelatin set into gel and cut into 1/2-inch cubes
1 cup canned ripe jackfruit
1/2 cup sweet corn
1/4 cup sweetened beans, drained*
1 cup kaong or nata de cocos, drained*
1 cup young shredded coconut, fresh or canned
1 cup cooked sweet yams or (ube halaya) glutinous purple yam, cut into 1-inch cubes

2 cup shaved ice
2 cup evap milk

Optional toppings:
4 scoops of favorite ice cream
drizzle of chocolate fudge
a small sliver or two of caramel (leche) flan
1/2 cup chopped peanuts, rice krispies, or corn flakes

1. To assemble - layer your fruits in a bowl or tall glass.
2. Top with crushed ice.
3. Pour milk over ice.
4. Then top with topping of choice.
5. Garnish with corn flakes and maraschino cherries.
*Available in Asian markets / groceries.

Wednesday, March 16, 2011

Japan


I am sure that you have been watching the news regarding the terrible events in Japan..... the earthquake... the tsunami... the radiation. Tragedy beyond words. Utter devastation.

I cannot even begin to imagine how it feels to be in the midst of that situation, let alone the sheer pain and grief of losing everything, including loved ones.

Japan is such a beautiful country with a fascinating culture and equally beautiful people. Strong. Proud. Determined. Smart. They are survivors.

They have come a long way from the Hiroshima bombing in World War II. No doubt, they will be able to overcome these horrific events and bounce back from it stronger than ever. In time.

For now, they need our help.

PRAY. Pray for all those affected that they will feel the love of God in this most difficult time.

DONATE. For me, there is no better organization for delivering fast, effective emergency relief than the Red Cross.

Please visit the link below to learn how you can donate to the Red
Cross today.


American Red Cross
Japanese Red Cross

Time is of the essence. Basics like food and water are running out fast. Your response is needed urgently.

Every bit helps.

Thursday, November 4, 2010

Ropa Vieja

Photobucket

The weather in South Florida has been so gloomy these couple of days, so I longed for something warm, comforting... something to satisfy my soul. So I thought of Ropa Vieja.

Ropa Vieja, or translated literraly as "tattered clothes or rags", is a Latin American cuisine. It is named as such because the shredded beef resembles so much like the ragged edges of an old clothing.... as explained to me by my Hispanic friends.

Photobucket

This dish is very similar to some dishes that we have in the Philippines, that's why I've taken so much liking to it. It is actually nothing but beef stewed in a tomato-based sauce. What makes this different though, is that it requires a specific cut of meat – flank - which can be shredded in long pieces.

In my opinion, the real secret to this dish is in the length of time the meat is braised. Longer braising allows more time for the flavors to meld well together, resulting in a very flavorful, tender meat that just melts in your mouth! Yum!

Photobucket


Pictured here is my version of Ropa Vieja. It is my opinion that the best way to enjoy this dish is to have it with rice. Plain rice. A little maduros (or fried plantains) on the side completes the meal.

Then you will be a happy camper.


Ropa Vieja
Adapted from Cooking Light

Cooking spray
2 (1-pound) flank steaks, trimmed
3 cups thinly vertically sliced red onion
2 cups red bell pepper strips (about 2 peppers)
2 cups green bell pepper strips (about 2 peppers)
4 garlic cloves, minced
6 tablespoons thinly sliced pitted green olives
1 teaspoon salt
1 teaspoon dried oregano
1 teaspoon ground cumin
1/2 teaspoon dried rosemary, crushed
1/2 teaspoon freshly ground black pepper
6 tablespoons sherry vinegar
3 cups fat-free, less-sodium beef broth
1 tablespoon no-salt-added tomato paste
2 bay leaves
1/2 cup chopped fresh cilantro

Preparation
Heat a large Dutch oven over medium-high heat. Coat pan with cooking spray. Add 1 steak to pan; cook 2 1/2 minutes on each side or until browned. Remove steak from pan. Repeat procedure with cooking spray and remaining steak.

Reduce heat to medium. Add onion, bell peppers, and garlic to pan; cook 7 minutes or until tender, stirring frequently. Stir in olives and next 5 ingredients (through black pepper); cook 30 seconds or until fragrant. Stir in vinegar, scraping pan to loosen browned bits; cook for 2 minutes or until liquid almost evaporates. Stir in broth, tomato paste, and bay leaves. Add steaks; bring to a simmer. Cover, reduce heat, and cook 1 1/2 hours or until steaks are very tender. Discard bay leaves.

Remove steaks from pan; shred with two forks. Stir shredded beef and cilantro into pan.

Note: This dish is definitely better the next day. Left-over meat can also be eaten with tortilla or taco.


Thursday, March 4, 2010

Breakfast Light and Delicious

Hello friends!

It has been a while since our blog has been updated. Life has a funny way of demanding your full attention, but hopefully it will once again permit us to share with you some incredible dishes we've created recently.

A wonderful opportunity came our way. A few months back, Mr. J and I have joined the hospitality ministry in our church. Every so often, roughly once a month, we have the pleasure of preparing breakfast for the awesome staff at our church,Metro Life Church,on Sundays between the two services. Yay! We love to do this since it is a good outlet for our culinary adventures. But wait, this came with a couple of minor challenges. First, the food has to be low-fat, whole grain and "heart-healthy" for the sake of our dear Pastor who has had a serious heart attack a couple of years back. We are primarily cooking for him so this has to be strictly followed. Secondly, the food has to be simple enough since the staff has only 25-30 minutes to eat breakfast before the next service starts.

Hmmmm... healthy breakfast. We can't serve oatmeal/muesli, fruits or dry whole wheat toast all the time, can we now? Definitely, the challenge is for us to come up with healthy breakfasts without sacrificing the deliciousness of our food.

For starters, we created a kind of deconstructed eggs florentine inspired by my fave celebrity Chef, Giada de Laurentiis. Normally, eggs florentine is served on English muffins, but instead, the beefsteak tomatoes took its place. This definitely lightened the dish a lot. The tomatoes are cut into almost 1/2 inch thick slices, seasoned with salt and fresh ground black pepper. Then they are topped with a creamy, cheesy spinach. For a healthier version, we used non-fat milk instead of heavy cream and reduced-fat cheese for the spinach. Then, lightly poached eggs went on top of the tomato-creamy spinach layer. Finally, we garnished it with strips of baked turkey bacon . (I wanted to just crumble them on top, but I discovered that turkey bacon is not crumbly like the regular one).

Almost always, some type of fruit is provided either as an alternative to those wanting something lighter, or as a side dish complimenting the main dishes. Today, we served fruit salad with strawberry, kiwi, and bananas sliced into bite-sized pieces. We let the strawberry and kiwi macerate in sugar and limoncello (lemon-flavored liqueur). Yes, we served a liqueur infused fruit to our Pastor - no wonder he was preaching so good today!!! LOL!!! Seriously, we only used a couple of tablespoons of it so it provided zero intoxicating effect . The limoncello infused the fruit with a bit of lemon flavor and served double-duty by keeping the bananas from turning brown. It was a wonderful alternative to using lime or lemon. Thanks, Ina Garten for this idea!

For the finale, we wanted to make sure any hunger pangs were satisfied, so we made a Danish pastry braid with two different kinds of filling: apple-cinnamon and apricot with confectioner's cream. Both Danishes were topped with coffee-infused glaze. The recipe came from the book, Baking with Julia.

In order to make the Danish a bit "healthier", I decided to experiment a little bit by using whole wheat pastry flour with the apricot-cream filled Danish. Admittedly, I had a bit of apprehension since I've never used whole wheat for pastry dough before. So, as a fall back, I decided to also make the regular dough using all purpose flour incase the whole wheat pastry was unsuccessful. I decided to fill the whole wheat pastry with the cream-apricot filling; while the regular pastry was filled with the apple-cinnamon.

Thankfully, the whole wheat pastry dough worked! They both tasted delish. There's nothing better than freshly baked Danish pastry! I did notice though that the regular all purpose flour came out more puffy than the whole wheat one. Not that this matters since it didn't affect the taste; and I'm not sure if the puff was was due to the flour, or due to how I handled the dough.

Any theories, you pastry Chef's out there? Anyhow, everyone liked the breakfast.. **sigh of relief here**.

It's a great feeling to know that your food is well appreciated, isn't it? We are cooking again in two weeks so we'll keep you posted. Hopefully, we'll be able to come up with another creative, healthy breakfast. Suggestions are welcome.


Eggs Florentine
by Giada de Laurentiis

You Need:
Vegetable oil cooking spray
4 thin slices prosciutto
3 tablespoons olive oil
1 small onion, finely chopped
3 cloves garlic, minced
5 cups (5 ounces) baby spinach
1/4 teaspoon ground nutmeg
3/4 cup heavy cream
2/3 cup grated Pecorino Romano
1 tablespoon kosher salt, plus extra for seasoning
Freshly ground black pepper
1 tablespoon fresh lemon juice
4 eggs, at room temperature
2 beefsteak tomatoes, trimmed and cut into 1-inch thick slices

Directions
1. Put an oven rack in the center of the oven. Preheat the oven to 400 degrees F. Spray a baking sheet with vegetable oil cooking spray.

2. Arrange the prosciutto in a single layer on the prepared baking sheet and bake until crispy, about 6 to 8 minutes. Remove from the oven and cool completely before crumbling into small pieces.

3. In a medium skillet, heat the olive oil over medium-high heat. Add the onion and cook, stirring frequently, until soft, about 5 minutes. Add the garlic and cook until fragrant, about 30 seconds. Add the spinach and nutmeg and cook until the spinach has wilted, about 1 to 2 minutes. Stir in the heavy cream and bring the mixture to a simmer. Cook, stirring occasionally, until the mixture thickens slightly, about 5 minutes. Remove the pan from the heat and stir in the cheese. Season with salt and pepper, to taste.

4. Fill a small saucepan with 3 inches of water. Add 1 tablespoon salt and the lemon juice. Bring the water to a simmer over medium heat. Crack an egg in a small bowl, taking care not to break the yolk. Slowly slide the egg into the water. Using a wooden spoon, carefully stir the water around the egg. Cook for 2 to 2 1/2 minutes until the white has set and the yolk is still soft. Using a slotted spoon, remove the egg from the water and drain on paper towels. Repeat with the remaining eggs.

5. To serve, place a tomato slice on each salad plate and season with salt and pepper. Spoon 1/4 of the spinach sauce over the tomato slice. Top with a poached egg and sprinkle with the crumbled prosciutto. Serve warm.
Monday, July 20, 2009

Strawberry Tart

Photobucket

I am back!

It’s been a while since my last post. I know, I know… this blog went into hibernation for almost 2 months. It was never my intention to neglect you guys, but it was a case of the spirit-being-willing-but-the-body-is-weak for me.

It has really been so hot these past few weeks here in Miami. After the initial rainy season as the summer began, the heat came with vengeance! We have been averaging 90+ degrees here everyday, with some days even up to the 100's. Talk about being hot and humid!

The heat sucks up all my energy, it seems, that at the end of the day, I barely have enough left to get through dinner. I'm pretty sure that the heat has affected my brain as well, and has caused the creative side of it to go into its sleep-mode. Hence, the lack of inspiration to blog.

The truth is, I’ve also been busy. Last month, we went on a road trip to visit Mr. J’s family in Ohio. Yep, we drove from Miami to Akron. It was a long drive, but we enjoyed every bit of that adventure. The best thing about driving is being able to do everything at our own pace. We stopped where we wanted to and even did some things that were totally unplannned! I used to not like doing anything not planned, but in the few years that I’ve been married, I’ve learned to be flexible. Thanks to Mr. J who taught me how to relax (that means, to do away with planning once in a while) and just enjoy. Spontaneity does bring good surprises -at times- wouldn’t you agree?

Photobucket

Growing up in the tropics, it seemed that we have summer all year long - we can practically swim almost the whole year round! In my early teenage years, we lived in an area where the beach was just a few minutes away. My father loved to go snorkeling, so we were at the beach almost every weekend! Can you imagine how dark I got as a young girl?

I have so much memories of our countless family beach outings. Thinking about those times never fail to make me smile.

Just like the berries that abound in summer. They make me smile too.

Another reason why I love this time of the year -- berries. There's the strawberries, raspberries, blackberries, blueberries, black currants, cherries - you name it, I love them all. (here in Florida, the strawberry season comes a bit earlier, but at this time, we still enjoy the strawberries coming from the other parts of the country.)

Photobucket

I enjoy the berries eaten as is, but I equally love them on desserts as well.

So, here’s a classic “strawberry-licious” tart which I’ve done a few weeks ago. To make this tart extra special, I made the pie crust as well. If you don't have time to make the pie crust, you can use the store-bought ones by all means. Making the crust requires a bit of effort, yes, but it is definitely well worth doing if you can.

Sharing this tart to Lasang Pinoy Sunday (La.PiS)– Crusty – for a flaky, perfect pie crust.

Have lots of fun family get-aways and memories in summer!


Strawberry Tarts
Ina Garten, Barefoot in Paris

1 1/4 cups all-purpose flour
3 tablespoons sugar
1/2 teaspoon kosher salt
6 tablespoons (3/4 stick) cold unsalted butter, diced
2 tablespoons cold shortening (recommended: Crisco)
1/4 cup ice water
2 cups Pastry Cream, recipe follows
2 pints whole strawberries, hulled and halved
1/3 cup apricot jelly
3 tablespoons shelled pistachios, halved, optional

Combine the flour, sugar, and salt in a small bowl and place in the freezer for 30 minutes. Put the flour mixture in the bowl of a food processor fitted with a steel blade. Add the butter and shortening and pulse about 10 times, or until the butter is in the size of peas. Add the ice water and process until the dough comes together. Dump on a well-floured board and form into a disk. Wrap in plastic and chill for at least 30 minutes.

Meanwhile, preheat the oven to 375 degrees F.

Roll out the dough and fit into 4 (4 1/2-inch) tart pans with removable sides. Don't stretch the dough when placing it in the pans or it will shrink during baking. Cut off the excess by rolling the pin across the top of each pan. Line the tart shells with a piece of buttered aluminum foil, butter side down, and fill them with dried beans or rice. Bake for 10 minutes. Remove the beans and foil, prick the bottom of the shells all over with a fork, and bake for another 15 to 20 minutes until lightly browned. Set aside to cool.

Before serving, fill the tart shells with the pastry cream. Arrange the berries decoratively on top of the cream. Melt the apricot jelly with 1 teaspoon of water and brush the top of the tarts. Sprinkle with pistachios, if using, and serve.

Pastry Cream:
5 extra-large egg yolks, room temperature
3/4 cup sugar
3 tablespoons cornstarch
1 1/2 cups scalded milk
1/2 teaspoon pure vanilla extract
1 teaspoon Cognac
1 tablespoon unsalted butter
1 tablespoon heavy cream

In the bowl of an electric mixer fitted with the paddle attachment, beat the egg yolks and sugar on medium-high speed for 4 minutes, or until very thick. Reduce to low speed, and add the cornstarch.

With the mixer still on low, slowly pour the hot milk into the egg mixture. Pour the mixture into a medium saucepan and cook over low heat, stirring constantly with a wooden spoon, until the mixture thickens, 5 to 7 minutes. Don't be alarmed when the custard comes to a boil and appears to curdle; switch to a whisk and beat vigorously. Cook, whisking constantly, for another 2 minutes; the custard will come together and become very thick, like pudding. Stir in the vanilla, Cognac, butter, and heavy cream. Pour the custard through a sieve into a bowl. Place plastic wrap directly on the custard and refrigerate until cold.


Monday, June 1, 2009

Coconut Shrimp With Coconut-Cilantro Rice And Rainy Days

Photobucket When it rains, it pours. Literally.

These past couple of weeks has been rainy down here in my neck of the woods. The southern part of the Sunshine State of Florida momentarily became gray and gloomy. Summer officially started, not with sweltering heat but rather, with a drenching downpour. Even as I write, outside dark clouds are beginning to gather and the day has started to turn dreary.

But, I am not complaining. For the most part, to me the rain has been a good respite to the otherwise hot and humid temperature in this part of the world. Our lakes were fast evaporating, the grounds were so dry and fires have ravaged our forests. So I say, it’s about time that we welcome heaven’s blessings, albeit wet. All I’m praying is that may these rainy days be NOT an indication of how the hurricane season would be like in the coming months (saying this with crossed fingers). Lord knows, the last thing we need in these challenging economic times is a catastrophic disaster in the likes of Hurricane Katrina. God forbid.
Photobucket

Isn’t it funny how circumstances in our lives happen to match the weather sometimes? That’s just what happened with me. This past week had likewise been somewhat emotionally cloudy and dismal due to a death in the family.

A dear cousin of mine, Nok, as he is fondly called, passed away. He was in his mid 40’s.

Nok and I grew up together; we were quite close. When my own mother fell ill with breast cancer, he was there for us. He stepped in for me as I couldn’t be physically in the Philippines as much as I'd like to, being that I now reside in the U.S. He drove my parents to the doctors every week for my mother’s appointments, rounds of chemo and radiation sessions. Ironically, the day my mother passed away on 2007, was also the day Nok was admitted to the hospital. That was the day we discovered that he had failing kidneys; the same day he started his weekly dialysis.

Unfortunately, Nok’s health deteriorated slowly ever since until he took his last breath on Sunday, May 31st.

Dealing with death of a loved one has always been difficult, no matter the manner and time of their demise -- this and added to the fact that Nok has been the 4th of a series of deaths that occurred in my family this past 3 yrs. Among these deaths was that of Nok’s younger brother, who passed away just last year. So you can understand how much of a blow this is to our family.

In memory of Nok, I’d like to dedicate this dish to my dear cousin, who loved life and food. Nok, though your presence will be sorely missed by all who love you, I am sure that you are in a better place now where pain and suffering do not exist anymore. Nok, thank you with all my heart for all that you have been to me and my family. May you rest in peace.
Photobucket

With that said, I'd like to share with you this Coconut Shrimp which I made with Cynthia's Coconut-Cilantro rice (of Tastes Like Home). This was made a while ago, but I've never gotten around to posting it. I don't know what got into me that night but I just was on a coconut mood.

To be honest, when I first got to the U.S. and tasted coconut shrimp, I did not like it. Uh-oh. Back in the Philippines, I grew up on shrimps simply prepared by steaming them with garlic, gingeroot, salt, pepper and vinegar (and sometimes with a touch of lime soda). However, Mr. J took me to Island Breeze one day - a restaurant that serves Jamaican food - and we had the coconut shrimp served with a spicy honey-mustard dip as appetizers. That was my point of no return. I became a convert. I fell in love with the dish at that moment. And the sauce. Oh, the sauce.... That's it, it must have been the sauce!

Anyhow, after that night, I promised myself that I have to try and re-create the dish, and the sauce. But while making the coconut shrimp, I had a big Aha! moment. I remembered Cythia's Coconut Cilantro rice. Why not give it a try? And I did. I'm so happy that I did. Cynthia, your rice rocks! This was very good, and I thought, it was the perfect pair for the shrimp. Thank you very much.

We had such a wonderful meal, I just wish we were having it at a restaurant by the beach. :o)

This dish is also my entry to Lasang Pinoy (La.Pi.S) Sunday - Pearly Shells
. La.Pi.S is a weekly food thematic event. If you want to know more, check it out a here.

For the Coconut-Cilantro Rice recipe, I will not be posting it here in deference to Cynthia. If you want a copy of the recipe, pls. go here . Drop a note to Cynthia and I'm sure, she'll be glad to share it with you.


Coconut-Shrimp
adapted from Cooking Light

18 unpeeled, large fresh shrimp
1 cup coconut milk (or butter milk if you don't have it)
2 tablespoons chopped fresh cilantro
2 tablespoons fresh lime juice
1 cup all-purpose flour
3/4 cup beer
1 (7-ounce) package sweetened flaked coconut
1/2 cup fine, dry breadcrumbs ( I used Panko breadcrumbs)
Peanut oil (I used canola)
Salt

Peel shrimp, leaving tails on. Butterfly shrimp by making a deep slit down the back of each from the large end to the tail, cutting to, but not through, inside curve of shrimp.

Stir together coconut milk, cilantro, and lime juice in a large bowl. Add shrimp, tossing gently to coat. Cover and chill 30 minutes. Drain shrimp from mixture (do not pat dry).

Whisk together flour and beer in a small bowl. Combine coconut and breadcrumbs in a shallow dish. Dip shrimp into beer batter; dredge in coconut mixture, pressing onto shrimp. Place shrimp on a baking sheet; freeze 20 minutes.

Pour oil to depth of 2 inches into a Dutch oven, and heat to 350°. Cook shrimp, in batches, 2 to 3 minutes or until golden. Drain on paper towels, and sprinkle lightly with salt. Serve immediately with the Mustard Sauce.

Mustard Sauce

Makes about 1 cup

Ingredients
1/3 cup pineapple preserves
1/3 cup apricot preserves
1/4 cup stone-ground mustard

Dash of hot sauce, if preferred

Preparation
Stir together all ingredients in a small bowl. Cover and chill.


Monday, May 18, 2009

Cheesecake, S'more inspired

Photobucket

Have you had kitchen disasters? I have, countless of 'em.

If you like to cook, or work in a kitchen, I am pretty sure you have your share of fiascos, those good-intentions-gone-awry. It is inevitable and, if you ask me, it's an essential part of learning. If only we can share our stories over a cup of tea (or coffee), I am sure that we'll have a real blast listening to each other's narratives about our respective kitchen mishaps. Wouldn't that be so much fun?

When I talk about my unforgettable "duh!" kitchen moments, there is one incident that readily comes to mind. It is quite memorable for me, and may I say, hilarious too.

This happened 15 years or so ago. Back then, I was just beginning to explore the world of baking. I've always been interested in learning how to bake ever since the cooking/baking class I had when I was still in school. Sadly after graduating from college, my carreer took over and I'd never had a chance to really practice what I had learned in that baking class - until I got a scholarship in Germany for a long term training.

When I was in Germany, I spent most of my free time with a Filipino missionary family, so much so that they considered me as their "adopted" daughter. Their place became my home-away-from-home. The wife, Sarah, happens to be fantastic in so many ways, her cooking/baking skills included.
It was her who took me under her wing and mentored me, with the goal of molding me into becoming a good wife, a nurturing mother, and yes, an awesome baker. :o)

One day, I was helping her make a cake (forgive me, but I don't remember what kind it was). It all went very well in the beginning, until the time came for me to pop the pan into the oven. As it was my very first unsupervised baking endeavour, I eagerly picked up the pan from the counter, carelessly grabbing the pan by its rim.

Alas, the bottom of the pan gave way and to my horror, the cake batter flowed out from the pan and onto the floor much like a volcano angrily spewing its lava out --- all in a matter of seconds. Just imagine my shock and dismay! For a brief moment, I remained frozen on the spot staring at the blob by my feet. How mortified I was !!!

I think Sarah was just as shocked. But then, we quickly recovered and like a true Filipino, eventually found the whole scene comical. We laughed.
Thankfully, Filipinos are known to have the ability to laugh at themselves, to find something funny even in the most dire situation. Truly, this trait has served me well on occassions, such as this one.

Photobucket


Anyhow, that was my initiation to a unique baking tool, the springform pan. That experience definitely beats any classroom session on Lesson 101: An Introduction to Springform Pans hands down, wouldn't you say?

To commemorate that unforgettable experience, I bought my very first springform pan in Germany (Kaiser brand) which I love and still utilise to this day. It is the very same pan that we used to bake this S'mores inspired cheesecake in.

Springform pans are essential for cheesecake baking due to their removable bottom (boy, do I know this now!). This unusual pan has a fastener on the side that can be opened to remove the rim after the cake is cool, allowing the cake to remain on its base. It is a worthy investment if you love cheesecake and would like to try making one.

This cheesecake flavor, if I may say so, was actually concocted by Mr. J. For days, he had been wanting to make a cheesecake with his own flavor combination. So, like a good wife that I am (ahem), I let him have his way in "my kitchen". Hahaha. (Ok honey, it's OUR kitchen.)

After surveying what we have in our fridge and pantry, Mr. J came up with this one. (He does have his flashes of brilliance..**wink**) I'd say, this cheesecake is a combination of his favorite eats -- S'mores + coconut.


(NOTE: For those who don't know, a S'more is a traditional campfire treat popular in the United States and Canada, consisting of roasted marshmallows and a slab of chocolate - usually Hershey's milk chocolate - sandwiched in graham crackers).

Being that this cheesecake was done by Mr. J, I regret to say that I won't have any recipe to share with you. He has not had the time to write it down for me and if I were to wait, it would be a loooooong time coming 'til that happens. :o) But, I do encourage you to infuse your cheesecake with your favorite flavors. I'm sure that the result will be amazing, just like how this one turned out for us. Good job, honey! This one definitely goes to Mr. J's "future restaurant menu item" file.

Photobucket

And since this cheesecake was that good, I can't help but share this, first, with Sarah. Sarah, you are and always will be my epitome of a Proverbs 31 woman. Thank you for being such a good example of a wife, mother and friend to me. This blog is an evidence of the time and effort you've invested in me. I miss you.

Next, a slice goes to this week's Lasang Pinoy Sunday (La.Pi.S) - Slice It Up. Sorry for being the perennial latecomer - but hey, I made it :oD. If you want to know more about La.Pi.S, kindly check it out here.

Enjoy your cheesecake. Laugh a lot; life is too short.

Monday, May 4, 2009

Puto Maya (Sweet, Sticky Rice), Sushi-Style

Photobucket

“Ohhh.,… it’s mango season again!”

The words came out from my mouth almost like a song when I saw some mangoes being sold in the grocery that I go to. Adding to my delight was the fact that the mangoes are the ones that taste and look like those that come from the Philippines. I don’t see them often in the local grocery stores; I get them from the Asian markets all the time. I believe they are from Mexico. Naturally, I grabbed a box before they ran out.

This is one of the reasons why I love spring. Mangoes.

Mangoes are probably my most favorite tropical fruit. If you ask me, this is one of the food items that I miss most from the Philippines. I am especially partial to the mangoes that come from the city where I was born/raised – Cebu (Guadalupe). Those mangoes are so sweet; it is a dessert in and of itself. No kidding!

Philippine mangoes have none of that fibrous / stringy stuff, which is characteristic of those green/reddish mangoes that abound here in South Florida. They are pure, sweet flesh and the best way to eat them is by hand—yeah, peel off the skin and bite into it just like you would an apple (except that you have to remember, mangoes have huge seeds in the middle - you don’t want to loose a tooth). It’s a bit messy, but it’s totally worth it.

Photobucket

Having these mangoes is so timely. April was a crazy month for me, reason why I was MIA from the blog scene. For some reason, the past month was jammed with a lot of activities that ran from birthdays, baby showers to church functions. In the midst of all the helter-skelter, I began longing for something comforting; something that reminds me of home --- and this breakfast trio just hits the spot: freshly cooked "puto maya" (sweet sticky rice cooked in coconut milk), with ripe, sweet, golden mangoes and finished off with a hot "sikwate" (hot chocolate/cocoa drink processed locally in the Philippines). What is more comforting than something you grew up with eating?

So with my precious mangoes at hand, I was ready to tackle making the puto maya. Normally, puto maya requires soaking the rice for at least 6 hours. I believe this process lessens the liquid (in this case, coconut milk) needed to cook the rice in, at the same time, shortening the cooking period. However, I didn't have the luxury, nor the patience to wait for 6 hrs, so I decided to do my own short-cut method, hoping that it will yield the same results - more or less. And it did, thank God.

Mr. J likes the puto with mangga (mangoes, in our dialect) as well. As a matter of fact, it was him who suggested that I make sushi rolls out of it. He goes, “why don’t you make it like sushi? Form the rice into sushi, roll the rice in brown sugar to make them look like those sushi with fish eggs, and then put slices of mangoes on top of it!” (But I discovered later on that the turbinado sugar which I used melts easily that it didn't look right, so I ended up just sprinkling the rice with sugar as you can see in the photos.)

A popular Filipino breakfast served the popular Japanese way? A Filipino-Japanese fusion of sorts. Cute idea, isn't it? Now why hadn't I thought of that before?

“Oh, that is brilliant, Honey!” was my excited response to him. Not only is it brilliant, but it sounds like really fun to do (and it really was). Hey, who says we can’t have fun with our food? .. Which reminds me, one of my favorite bloggers, La Tartine Gourmande, did something similar to this but using rice pudding. Mind you, my hubby hadn't seen her post, so he thinks that this was a very original idea. I didn't have the heart to break it to him, so, let's just keep it a secret....ok??? SHHH...

Photobucket

This puto-mango-hot chocolate trinity is my entry to this week's Lasang Pinoy Sundays - Shades of Spring and Summer . La.Pi.S is a weekly food thematic photography meme, Filipino style.

Also, I'm sharing this to Iska of Iskandals for her Bloggoversary. Congratulations, Iska and here's to many more prolific years of cooking, eating and blogging!

Puto Maya
2 cups glutinous rice (sweet, sticky rice)*
4 cups thick coconut milk
3-1/2 tsps salt
1 cup sugar (or less, depends on how sweet you like it to be)
2-pcs ginger root cut into approx. 1", washed and smashed

1. Rinse rice and place in a 2-qt pot.
2. Add coconut milk, cover and let it come to a boil. When boiling, add the rest of the ingredients. Stir.
3. Turn heat to a lower setting and let mixture simmer for about 15 minutes or until rice is done. (I had to test the rice every now and then).
4. When done, scoop out rice, discarding the ginger root.Wrap rice in clean banana leaf, if available, and steam for about 30 mins.
5. If not, mold into cups and sprinkle with brown sugar if desired. Best enjoyed when warm, served with ripe mangoes and sikwate (hot chocolate).

Sikwate (Hot Chocolate/Cocoa Drink)
2 cups water
4 or more pcs tablea (pure dried cacao)*
1/2 cup brown sugar (or more, depends on your taste)

1. Place water in a pot. Let it come to boil.
2. Add the tableas and whisk vigorously by hand until tableas have melted.
3. Add sugar. Adjust sweetness to taste.
4. Serve with puto maya, while hot.

*NOTE: Glutinous (sticky) rice are available at Asian markets. Tablea is a Philippine product, so you might need to find a Philippine specialty store. Otherwise, you may use unsweetened cocoa powder as substitute.

Saturday, April 4, 2009

Gelato di Riso (Rice Gelato), Homemade

Photobucket
“We gotta go to Vivoli!”, my friend Monica insisted.

According to her trusted travel resource,
Rick Steve’s Travel Guide, Monica informed us that Vivoli is said to make the best gelato in Florence, or in Italy for that matter. And Rick recommends trying the rice gelato.

"Rice ice cream?” I said, “never heard of that before! But rice + ice cream together? What’s not to like? That must be good".

Monica didn’t have to convince the group any further. Off we went to find Vivoli.

This conversation happened many years ago one summer. A couple of my colleagues and I decided to spend our summer break in Italy while being student-trainees in Germany. We were the typical student travellers – backpacking and staying in youth hostels. We really didn’t have that much money but we made the most of what we had. We met Monica while in Verona (of famed Romeo & Juliet), our first leg of the trip. Since she was traveling alone, she decided to hook up and tag along with us. So we were together in the next 4 weeks exploring Italy and became fast friends. Those were good times – no, best times.

It was in our stop in Florence that Monica mentioned this Gelateria that is a must-visit according to Rick Steve. (Rick Steve’s is a good resource when it comes to budget travels!)

After a bus ride and a lot of walking, we finally managed to find Vivoli. It was a small Gelateria, but boy, was there a long line outside of the shop! Not surprising though, because if it is the best Gelateria in Florence, then it follows that the place should be popular. So we fell in line. It must have taken us around 30 minutes to finally get our turn. Not bad, really. We were on vacation so time was on our side.

Needless to say, I had my Gelato di Riso for the very first time then. And I’m telling you, that was a piece of heaven in a cup (they don't have cones)! Yum'oh! It was so creamy, not too sweet -– everything that you had hoped a gelato would be – but with rice! It’s like a frozen rice pudding, but better! Indeed, our efforts paid off.
Photobucket
Last month, I got an ice-cream maker. It was one of those points-reward that Mr. J got from his job – so we got it for free! I love free stuff, don't you? Of course I wanted to make ice-cream immediately to try my new toy. For others, the logical thing to do might have been to make something basic for the first time. Something that’s probably from the recipes that come with the manual. But no, I am not like that. (Yeah, I’m crazy). I wanted to do something ambitious. I wanted to do something simple -- but not that simple, you know what I mean? (If you're a girl, then you'd know what I mean!)

So just out of nostalgia from that trip in Italy – and because I am Asian – I decided to make rice gelato. It had been many years ago since I had this ice cream. I don’t remember exactly how the taste was but all I know was that it was very good!
Photobucket

And so I began searching online for some recipes, which eventually led me to David Lebovitz’, The Perfect Scoop. This recipe book received so many good reviews from Amazon buyers, and most of all, it had the Rice Gelato recipe that I was looking for!!!! So that sealed the deal. I bought a copy.

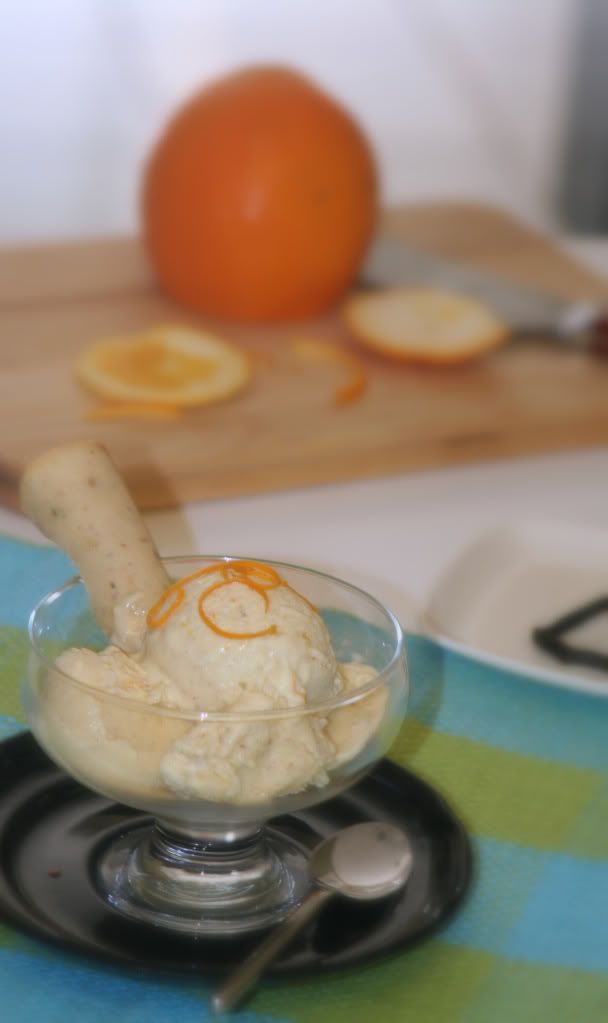
After so many years, I had rice gelato again! It was creamy, super delicious. The only complaint Mr. J had was that it was too "orangey" - which was my fault. If you read the recipe, it required two strips of orange zests. Well, I made a mistake of pureeing the zests with the rice mixture (wasn't really a mistake because I decided to do it). Plus, I also added a teaspoon of orange liquour. So you can really taste the orange in the ice cream. Mr. J found the orange taste overpowering - maybe so - but I liked it. With the ice cream I made the hazelnut tuile cookie, that I shaped using the wooden handle of a spoon (for that cigar shape).


This rice gelato is my entry to this weeks' Lasang Pinoy Sunday (La.Pi.S) - Melted Bliss. Eating this ice-cream took me back to Italy..... What a bliss, indeed!

Photobucket


Rice Gelato (Gelato di Riso)
David Lebovitz

1/2 cup Italian Arborio rice*
3 cups whole milk
3/4 cup sugar
pinch of salt
1 vanilla bean*, split in half lenghtwise
Two 1-inch-wide strips of orange zest
5 large egg yolks (save the whites for use later)
1 cup half-and-half or cream
Pinch of freshly grated nutmeg

1. Preheat the oven to 350.

2. In a 1.75 to 2 quart baking dish, mix together the rice, milk 1/4 cup of the sugar and the salt. Add the vanilla bean and strips of orange zest.

3. Cover the dish with aluminum foil and bake for 1 hour. Remove the rice from the oven and remove the foil. Stir in the remaining 1/2 cup sugar, then continue to bake the rice, uncovered for another 30 minutes.

4. Remove the rice from the oven a second time, remove the vanilla bean and orange zest and briskly whisk in the egg yolks at once. Then whisk in the half and half or cream and nutmeg.

5. Puree half of the rice mixture in a blender or food processor until chopped fine then stir it back into the cooked rice.

6. Chill the mixture in the fridge (I left mine for 2 hrs), then freeze it in your ice cream maker according to the manufacturer’s directions.

*NOTE: I made mine 1/4 c arborio rice and 1/4 c sweet "gelatinous" rice, aka sticky rice. I thought that the sticky rice would make the ice cream a lot creamier, which it did. I didn't have a vanilla bean, but I used a good quality vanilla bean paste. But if you don't have the vanilla bean or paste, I believe that vanilla extract would do.

Monday, March 23, 2009

White Chocolate Macadamia Cookies & 100th Post

Photobucket

It’s my 100th post! Yay!

I don’t know what but the number 100 sounds like a big deal, huh? It’s like reaching a milestone. It did take me a year to reach 100 posts but still, it is some sort of an achievement considering that I’ve had homepages in the past that I haven’t attended to after the novelty wore of… However this time, I don’t think I’ll ever outgrow this blog, at least, not for a very long time.

This past week turned out to be eventful for us -- an action packed, hair-raising thrill of an experience. I’m not talking about the Twilight movie (which was neither scary nor suspenseful) but rather, I’m talking about our REFGRIGERATOR CATCHING FIRE!

Yep, we had fireworks right in my own kitchen. Imagine the horror of having our fridge burst into flames right before me? You don’t see that everyday, do you? We had power outtage one evening, and the surge of current when the electricity came back on apparently was too much for my old, faithful fridge that she gave up on us. She went out not just with a bang but with fireworks to boot… literally!

Thankfully, the fire didn’t catch any paper, plastic or cloth nearby (there wasn’t any, whew!) so it went out immediately just as instantly as it happened. But of course, I already screamed “FIRE!” to the top of my lungs that Mr. J must have leaped from upstairs going down to the kitchen as he was there in an instant. Scary thing, huh? Once again, I am just so grateful that nothing worse happened – it could have razed our house to the ground, you know.

Well, this leaves us with no choice but to get a new fridge! Yipee! And who wouldn’t want a new fridge? Yeah, I wish that the timing was better (with what’s going on in the economy, I don’t think we should be spending on anything right now), but this case is an exception. We gotta do what we gotta do, right?


Photobucket

After all that excitement, I certainly needed something to calm me down .. something familiar, comfortable and easy but yummy - like this white chocolate macadamia cookies.


This is Mr. J and I's all-time favorite cookie. It's especially good for me as I need to stay out of caffeine, which dark chocolates (or regular ones for that matter) have plenty of. Though technically, white chocolate is not really chocolate - but it's a good enough subsititute for me. I'm willing to be fooled, if it's this good.

So, do you like your cookies crunchy or soft? Well, I'm kind of in between. I like them not to crunchy - I like them a bit softer, so I underbake them a little bit (about 2-3 mins), and just leave them a minute or two on the cookie sheets before removing them. Also, I feel like it's better to toast the nuts before mixing them in the batter as it helps heighten the flavor of the macadamia in the cookies.

Keep these away from you... They're dangerous. You don't want to eat them all at once, do you?

Photobucket

White Chocolate Chip Macadamia Nut Cookies
1 cup butter, softened
1 cup granulated sugar
3/4 cup light brown sugar, packed
2 teaspoons vanilla
1/2 teaspoon salt
2 eggs
2 1/2 cups unbleached all purpose flour
1 teaspoons baking soda
10 ounces white chocolate* (chips or bars cut in chunks)
1 cup macadamia nuts*, chopped into chunks

1. Heat oven to 375 F. In large bowl, beat butter, granulated sugar, brown sugar, vanilla, and salt with electric mixer until creamy.
2. Add eggs, beat well. Stir together flour, and the baking soda; gradually add to butter mixture,beating until well blended.
3. Stir in white chocolate chips and macadamia nuts.
4. Drop by rounded teaspoons onto ungreased cookie sheet. Make sure to space them evenly to allow for spreading, about 1-2 inches apart.
5. Bake 8 to 10 minutes or until set. (Edges are golden brown and center is set.)
6. Cool slightly, remove from cookie sheet to wire rack to cool completely.

*NOTE: Use good quality chocolate like Ghirardelli, Callebaut or Godiva. It makes a difference. If you're toasting the nuts, make sure that you cool them first before adding on to the batter. If you can't find macadamia around, probably a good substitute would be cashew nuts. As mentioned above, undercook slightly for softer cookies.

Sunday, March 8, 2009

Sweet Challah

Photobucket

This past week has gone by so fast. I couldn’t even believe that the weekend has come, and just as quickly, is gone. But you know what they say, when one is busy, one barely notices the time. I was defintely preoccupied at work. It was a pretty interesting week for me, to say the least. I wish I can engage you in an office gossip – but nah… LOL… you wouldn’t appreciate that in a food blog, would you now? ;oD

Anyways, I’ve always been a person who cannot sit still. I like to be busy. No, I thrive at being busy. I am always doing something even when I am sitting down. I’m the type who’s ever on-the-go and always ready to rock and roll, so to speak. I’m used to last minute changes and I adapt immediately to situations when need be.

The downside of this is that it isn’t easy for me to relax, and by this I mean, to just sit down and do.... nothing. I feel like there is always something important for me to do with my time. I have to deliberately slow down. Mr. J is very good at reminding me of this (thank God). I realize that I do need to take a break once a while. It is indeed important to take the time to appreciate the things around us, to enjoy and take in what we have at the moment, otherwise, we might miss out on a lot (and it might be too late when we realize that we did).

Anyways, enough about my rambling.

Photobucket

I love bread. Growing up though, I wasn’t so much of a bread eater. As you know, being Asian means that my house had more rice and noodles than bread. In the Philippines, the only meal served with bread is breakfast (pan de sal). Other than that, bread is more of a snack item to Filipinos than anything else.

However, my short stint in Europe years ago, and now being based in the U.S., have slowly changed me. I’ve come to eat bread with my meals more and I don’t crave rice as much as I used to. (Ugh. I can almost hear the gasp of some Filipinos who may scream “sacrilege!” )

I love to bake bread. Nothing compares to that sweet aroma that tantalizes our senses when baking at home. Unfortunately, with all the hustle and bustle of life, I rarely get the chance to bake them--- and I mean bake ’em in the old fashion way of kneading and manhandling the dough! Hehehe…. (It’s a good stress reliever, actually).

Photobucket


One of the breads that I love eating is Challah (pronounced “khal-lah” - you gotta make that gutteral sound too). Challah is a braided, eggy loaf of bread traditionally eaten by Jews during Sabbath, holidays and other ceremonies. It is very close to the French brioche.

I decided to make Challah for the first time. I buy it all the time so might as well try my hand at it. It came out good, didn't it? With a bit more practice, I'll have the braiding part down in no time.

Nothing beats home-made breads. They’re the best.

Sharing this home-made Challah to Lasang Pinoy Sunday: Bready Or Not. Lasang Pinoy (La.Pi.S) is a weekly food thematic photography meme, Filipino style.

This is also my entry to Homemade#2 Bread, an wonderful event by Ben. Hop over to there to check out all the wonderful creations by other home bakers.

Sweet Challah
from Cooking Light
1 package dry yeast (about 2 1/4 teaspoons)
1 cup warm water (100°F to 110°F)
3 tablespoons honey
Dash of saffron threads, crushed
3 tablespoons butter, melted and cooled
1 teaspoon salt
1 large egg
3 cups bread flour (about 14 1/4 ounces), divided
Cooking spray
1 teaspoon cornmeal
1 teaspoon water
1 large egg yolk, lightly beaten
1/4 teaspoon poppy seeds* (I used more than this amount)

Preparation
1) Dissolve yeast in 1 cup warm water in a large bowl; stir in honey and saffron threads. Let stand for 5 minutes. Add melted butter, 1 teaspoon salt, and egg; stir well with a whisk.

2) Lightly spoon flour into dry measuring cups; level with a knife. Add 2 3/4 cups flour to yeast mixture, and stir until a soft dough forms. Cover and let stand for 15 minutes.

3) Turn dough out onto a lightly floured surface. Knead until smooth and elastic (about 8 minutes); add enough of remaining flour, 1 tablespoon at a time, to prevent dough from sticking to hands (dough will be very soft).

4) Place dough in a large bowl coated with cooking spray, turning to coat top. Cover and let rise in a warm place (85°), free from drafts, 40 minutes or until doubled in size. (Gently press two fingers into dough. If indentation remains, the dough has risen enough.)

5) Punch dough down. Shape dough into a ball; return to bowl. Cover and let rise an additional 40 minutes or until doubled in size. Punch dough down; cover and let rest 15 minutes.

6) Divide dough into 3 equal portions. Working with 1 portion at a time (cover remaining dough to prevent drying), on a lightly floured surface, roll each portion into a 25-inch rope with slightly tapered ends. Place ropes lengthwise on a large baking sheet sprinkled with cornmeal; pinch ends together at untapered ends to seal. Braid ropes; pinch loose ends to seal. Cover and let rise 20 minutes or until almost doubled in size.

7) Preheat oven to 375°.

8) Combine 1 teaspoon water and large egg yolk, stirring with a fork until blended. Uncover loaf, and gently brush with egg yolk mixture. Sprinkle evenly with 1/4 teaspoon poppy seeds. Bake at 375° for 30 minutes or until loaf sounds hollow when tapped. Cool on a wire rack.

*NOTE: You may also leave the poppy seeds out, or substitute with sesame seeds, or maybe use sunflower seeds for that matter.


Sunday, March 1, 2009

Mustard Flavored-Tuna & Veggie Tartlets and a Blog-anniversry

Photobucket
I have an impulsive nature. I always have ever since I was young. But I have to admit that with age comes restraint (I'd rather call it wisdom though). I’d like to believe that since I am now much wiser, hence I'm less impulsive.

Well, this blog is a result of such impulse. I didn’t plan on having a food blog, never thought of having one ever before in my life – although to be honest, I had already been browsing other food blogs for recipes and inspiration. But one day after entertaining some friends in the house, I wanted to take a picture of my husband’s creations, thus, the thought of starting my own food blog came to mind… and I acted out on it immediately.

And so, Spice Of Life was born in cyberspace around this time last year. Wow. Time indeed passes by so quickly. This is one of those rare times that my impulse yielded some positive results.

Photobucket

I am truly thankful that I have this blog. Despite the dedication and the hours that it requires, I do love sharing my passion with you. This blog had opened a whole new dimension of culinary exchange for me and have allowed me to meet some of the most talented, creative, fun and kindhearted people from all over the world. Albeit these friendships are virtual, nevertheless I feel that sharing a common love and interest in food and food photography have somehow forged a bond among us.

So, to all those who faithfully visit and for those who are just checking this blog out for the first time – THANK YOU. I do hope you’ll continue to come, and I look forward to learning from you in as much as I hope that somehow, I’ve inspired you to cook your meals at home through this blog.

To celebrate my blog's 1st birthday, I’ve decided to do a recipe that’s from one of the most favorite food blog that I visit regularly –
Bea of La Tartine Gourmande. I distinctly remember this particular dish of hers, because I was attracted to its vibrant colors, not to mention that I love Tuna. It is a very pretty and nutritious dish…. and did I tell you that I love tuna? :o)

So to celebrate my bloganniversary, I have created Bea’s
Mustard-flavored Tuna and Veggie Tartlets. The only minor thing I did to the recipe was to change up the flours. Her’s is a gluten-free version but since I have no gluten problem, I decided to use ½ cup wheat flour instead of quinoa, and ½ cup teff instead of millet flour. Thus, my crust came out darker than hers.

Photobucket

This is a very filling but healthy dish. I especially like the fact that you get the crust, tuna, cheese and veggies all in one bite! I’m glad that I tried this. If you want to, check out the recipe
here

Bea, I hope that I’ve done justice to your beautiful creation.

I am also serving this dish to the Lasang Pinoy: Tri-colore. The three colors here being the green from the zucchini, red from the tomatoes and white from the cheese.

Lasang Pinoy (La.Pi.S.) is a weekly thematic food photography meme, Filipino style.